
In modern times, when prices are already drives a relatively small, and their capacities are increasing, people are increasingly thinking of building your own home array. Domestic matrix is the best and cheapest way to increase the speed of our system - just have two hard drives to be able to enjoy transfer almost twice larger than the single drive, which directly translates into a charging time of the system or the speed of opening applications, not to mention the operations on files. Let's start from the beginning, which is the theory.
Let us help you with RAID data recovery in Las Vegas.
The hero in the theory
I do not intend here to describe accurately the operating rules of the matrix, but only briefly introduce them to bring issues to individuals not ever contact with RAID. RAID 0 is the knitting together of two or more hard drives into one unit. One should note that the resulting area is the size of the smallest drive multiplied by the number of disks. For example, with a matrix composed of three drives, two 250GB and one 200GB get a space of size 600GB.
Examples:
- 80GB = 3x 80GB = 240GB
- 200GB + 250GB = 2x 200GB = 400GB
Data so generated matrix / space are interspersed between the discs, so you get almost double the performance (when you use two hard drives), as the operations are spread over two physical drives. When you add another (third, fourth, etc.) drive to RAID 0 performance increase will be directly proportional to the number of disks.
Examples:
- 2 hard drives = performance read and write operations will be almost twice as fast than if a single drive
- 3 = performance hard drives read and write operations will be almost three times faster than in the case of a single drive
Unfortunately, such a classification of data related to a certain danger, enough to crash has at least one drive in the array, and all data will be lost. The reason is that the entire RAID 0 is seen as a whole. The other most frequently mentioned disadvantages of RAID 0 is that the maximum size of the matrix is a multiple of the smallest drive.
Test Platform:
- Processor : Core 2 Duo E8400 (6M Cache, 3.00 GHz, 1333 MHz FSB)
- RAM : 2x Kingston KVR800D2N6/2G
- Motherboard : Abit AB9 Quad GT (BIOS v1.6)
- HDD : 2x ST3250410AS and WD2500KS
- Software:
- Windows 7 Home Edition X86
- HD Tach v3.0.4.0
- HD Tune v2.53
- Everest v4.20.1219 Beta
- Intel Matrix Storage Manager v7.6.0.1011
We begin to create
Why just RAID 0? Several reasons. The most important is performance, for it is the most efficient form of RAID, and the most common at home, because it is cheapest to build. To build the simplest RAID 0 is enough only two hard drives with a capacity adds up to a "more drive" seen by the system, so we do not waste space, as it is for example in the case of RAID 1 (mirroring). There is also its drawbacks, most of them, which you definitely need to mention is the high risk of losing data during a failure of any of the disks forming a part of the matrix. Unfortunately, this is a risk of losing all your data, how we already know all the pros and cons, let's get on with construction of our matrix. first step is to connect our hard drives to the controller. Because we use the controller built into our motherboard, this operation is no different from ordinary hard drives. Here, a small note - some motherboards have more than one controller, and it is worth to first ascertain which is more efficient to not expose yourself to unnecessary loss of performance of our matrix!
RAID 0 data recovery
The next step is setting in the BIOS of our motherboard mode disc, in our case it is RAID. At various manufacturers of motherboards and BIOSs, this option can be otherwise called, and be in a different tab in the BIOS. He's come to our aid instruction manual for the motherboard, where you'll find everything described, or you can look at the site producer. It should have all necessary information for setting the operating mode of the RAID controller.

After selecting the mode in the BIOS time to save the setting and restart the computer. At the start we will show information about disks and RAID controller, and a combination of keys to be pressed to enter the menu controller. In our case it is the combination of CTRL + I. After the press are already in the configuration menu of our matrix.
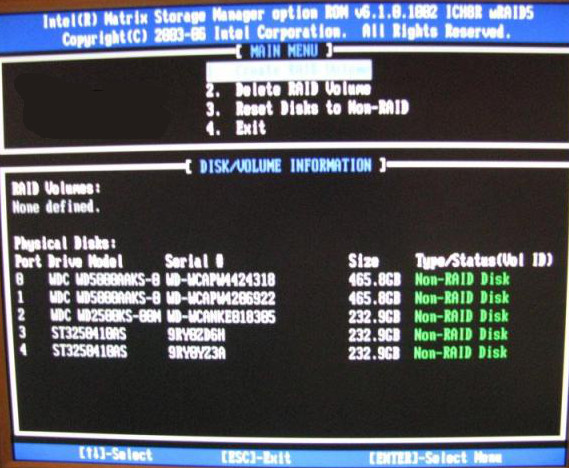
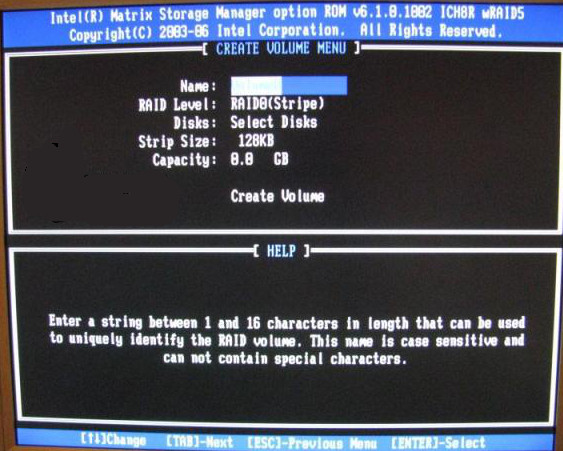
Check the "Create RAID Volume" and press ENTER. In this way, go to a submenu where we have ability to configure the array. First field is an array name - any name with length from 1 to 16 characters. Subsequently we have to choose the level of the matrix . we remain the default value, which is the title RAID 0, also called Stripe.
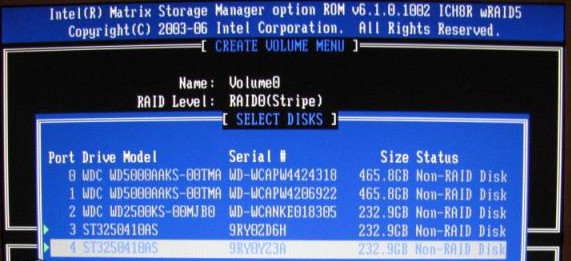
In the case where we have more than two hard drives, we have the ability to edit the "Disks", in which we can identify drives that become part of the matrix. After entering the option "Disks" select disk space before crashing their name cursors. When finished selecting the ENTER key to confirm the changes. However, if we have only two drives, this option is not available due to the fact that in a RAID 0 Minimum number of disks is two.
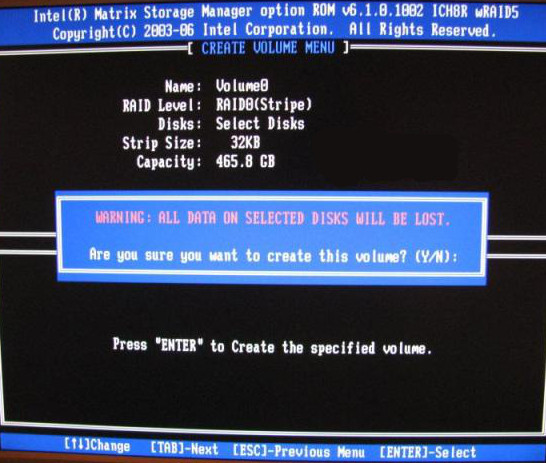
Another option is the "Strip Size", whose size can be changed using the cursor keys. Is the most important parameter affecting the performance matrix. For more on this option, you can read later in the article. In our case, is set to 32KB. Last option to choose from including submenu is "Capacity", which allows us to determine the maximum size of the matrix. The default is set to the aggregate value of the capacity of our hard drives, and so it is recommended to leave.

Left us with only select "Create Volume" in order to approve the changes. When you select this option, you still get a message that the fact that all data on the selected drives will be lost. In mid-message answer yes and after that we get a ready array.
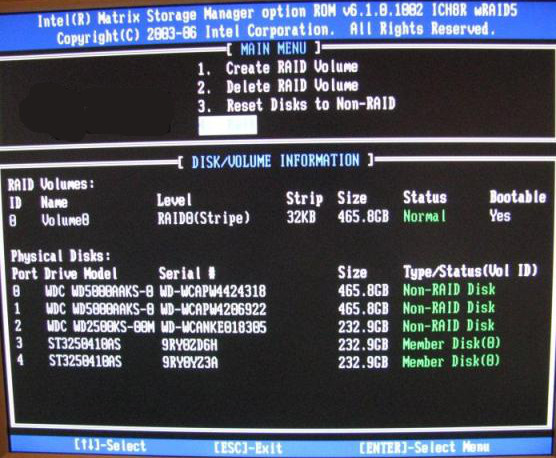
We can now look at our array in the main menu configuration program. Our selected drives the status of "Member Disk", which means that part of the RAID array and are ready to use.
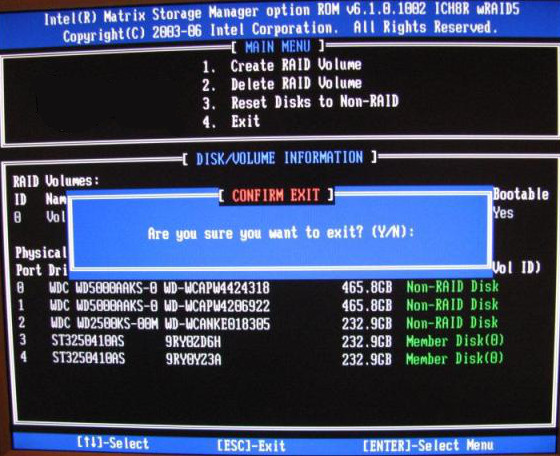
Now we can leave the configuration program that will ask us on the way, if you really want to do it - of course we respond in the affirmative.
Our matrix is ready for use. System installation is no different from almost nothing installed on a single disk. In the case of Windows Vista or 7 is almost identical, but when it comes to Windows XP is required RAID drivers during installation. At the beginning of the installation of Windows XP, just after the appropriate message (it will appear at the bottom of the screen), press F6 and insert the driver diskette (floppy disk should be supplied by the manufacturer of the motherboard) at the station. A menu appears from which you select your RAID controller driver. Further installation is now standard, as a single hard drive. In the event of failure of this act or its improper conduct will receive an error message or the installer does not detect any hard drives.

