- Home
- About Us
- Recovery Services Individual RecoveryEnterprise RecoveryAdditional Recovery
- Software
- Testimonials
- Locations
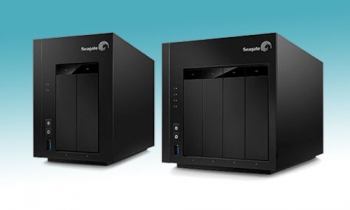
Seagate NAS Recovery – 2-bay and 4-bay
Seagate Technologies offers a low end NAS solution for the power home user and small business owner who has fewer than 25 employees. The Seagate NAS 2/4-bay solutions are the bed rock answer for those who have a need for secure remote data access but want to remain conscientious in the area of cost. The NAS is outfitted with a Marvell 1.2 GHz processor and a minimal 512 MB of DDR3 memory. The NAS can be purchased as a shell for a little under $200.00 and the user may add their own drives. A standard 10 GB Seagate NAS 2-Bay device is in the neighborhood of $700.00. Purchasing all of the hardware from Seagate does offer a certain seamless feel to the mechanism especially since the drives that are installed in the system are designed specifically for their NAS device.
Each NAS device is tested individually to ensure quality control and a long lasting device. That being said there will still be occasions where the device fails and diagnosing the problem in a failure can in and of itself be a daunting task. In order to alleviate some of the guess work and stress when encountering a problem the Seagate NAS has a set of LEDs that offer instruction on the current problem. Each drive has its own LED and the device itself has a ‘STATUS’ LED for identifying the current state of the NAS. I offer the following as a guide to what to do if and when you have blinking warning LEDs from a Seagate NAS.
- Status LED Alternate Red and White/Drive LED Alternate Red and White
This situation indicates that either the native OS (NAS OS 4) is being updated, there is a drive synchronization in progress, or there is a volume check in progress. All of these things mean that there are read and write operations in progress that will definitely affect the health of your NAS. If during the time of this status you lose power without the advent of a viable UPS the resulting power on could be catastrophic. There may be a file system check initiated that could in fact destroy data. If the operating system is being updated there is a possibility that the system will not boot at all and a full reset will be necessary in order to boot the device. A full reset can in fact wipe out all data in order to give the device a clean start.
If the data on the system is critical then I would pull each drive and make a sector by sector image onto another system before proceeding. If something does happen at least you will have saved the original state of the data and allow for a qualified Seagate NAS recovery company to attempt a full recovery.

SQL FAQ – Preparing For The Retirement Of Microsoft SQL Server 2005
Mainstream support for Microsoft SQL Server 2005 ends in half a year – April 2016. This provides plenty of time for CTOs and DBAs to prepare a Microsoft SQL Server upgrade or migration plan, but what are the options open to them?
The platform
At this point in time, the smartest move would be to skip Microsoft SQL Server 2008 and 2012, and move straight on to SQL Server 2014. Choosing to use the latest version of the database engine will help to maximise the lifespan of the platform and lengthen the time between upgrades.
Your business will also be able to take advantage of new features, like full text search, that are not available in intermediate editions of Microsoft SQL Server.
Upgrade option #1 – In-place upgrade
Simultaneously the easiest, and potentially most risky option, an SQL Server in-place upgrade involves installing the new software, preferably SQL Server 2014, over the top of the existing system. The database engine is then upgraded, as are the tables and any other “moving parts”.
However, anything but the most basic of SQL Server environments (think single instance) is unlikely to be quite so straightforward. The in-place upgrade route is probably not the correct upgrade path for enterprise databases.
The other potential problem with in-place upgrades is the lack of simple rollback in the event of a problem. The database server(s) will need to be taken offline, whilst a full SQL Server recovery procedure is performed using the last full back up.
Microsoft private cloud backup challenges
There are two major challenges that must be addressed when backing up a Microsoft private cloud: figuring out what needs protection and backing up virtual machines.
One of the big trends in IT is the move from relatively simple virtual server environments to private or hybrid clouds. As organizations contemplate such a transition, they must consider how a private cloud implementation will impact their backup process.
A Microsoft private cloud is built from the same basic components as a typical Hyper-V deployment: Hyper-V servers, System Center Virtual Machine Manager (SCVMM), and one or more Cluster Shared Volumes. If your organization uses Microsoft Hyper-V, you probably know how to back up these components.
When it comes to backing up a Microsoft private cloud environment, there are two challenges that must be addressed:
VCP 5 – Objective 5.5 – Backup and Restore Virtual Machines
Identify snapshot requirements
Snapshots preserve the state and data of a VM at a particular point in time. They are useful as a short term solution for testing software with unknown potential. You can take multiple snapshots a VM. Each branch within a snapshot tree can contain up to 32 snapshots. A snapshot preserves the following
- VM settings – the VM folder including disk that were added or changed after the snapshot has been taken
- Power State – Whether the VM was powered on, off or suspended.
- Disk State – state of all the VMs disks.
- Memory State (optional). The contents of the VMs memory
Each snapshot has a parent and a child, except for the last snapshot which has no child. Each parent can have one more child snapshots. You are able to revert to either the current parent snapshot, or any parent or child snapshot from within the tree. Each time you revert to a snapshot and take another, a new branch or child snapshot is created.
When you take a snapshot of a VM, you can also chose to quiesce the VM files. In order to quiesce a VM you need to have VMware Tools installed. A quiesce operation ensures that a snapshot disk is in a consistent state.
Taking a snapshot of a VM will create several files depending on the amount of disks you have assigned to the VM and whether or not you decide to capture the VMs memory state along with the snapshot. A snapshot can create the following files.
- Delta disk files – This is a .vmdk file that the guest operating system has write access to. This will store the deltas or differences between the current state of the virtual disk and the state that existed at the time of taking the snapshot. A delta disk, just as a standard virtual disk contains two files. A descriptor file that contains information about the disk and a corresponding file that contains the data (this disk is represented by a -flat.vmdk).
- Database File – This is a .vmsd file that contains the VMs snapshot information. This is the primary file accessed by the snapshot manager as it contains line entries defining the relationships between snapshots and between the child disks for each snapshot.
- Memory File – This is a .vmsn file that includes the active state of the VM. This allows you to revert to a VMs powered on state, whereas if you chose not to capture the memory you can only revert to a 'turned off' VM state. Including the VMs memory in the snapshot will delay the time it takes to snapshot the VM as it needs to dump the VMs memory to disk (more memory the VM has, the longer it takes).
Copyright © 2026 DataRecoup Recovery Services. All Rights Reserved. Designed by DataRecoup Lab.
