- Home
- About Us
- Recovery Services Individual RecoveryEnterprise RecoveryAdditional Recovery
- Software
- Testimonials
- Locations

Synology Data Recovery – Disk Station CPU Configurations
Synology Data Recovery has become a large portion of DTI Data’s recovery business over the past year, with that we thought it only prudent to spend some time explaining how these NAS devices function and why they are vulnerable to data recovery needs. NAS devices come in many sizes and configurations. Each device has its own set of hardware specifications that enables it to do certain jobs within a specific end user environment. It is up to the end user to take a look at what their specific needs are and in doing so pinpoint as accurately as possible the type of NAS hardware necessary to optimize performance results. Whether it be home, business, or enterprise applications it is always necessary to make sure that you pick the right tool for the right job.
That being said, Synology offers a set of NAS devices that bring a great many possibilities for the end user. Each NAS device has its own set of pros and cons and as such should be scrutinized with an eye for current usage as well as future expansion. The following is a brief look at the different CPU types for the Synology Disk Station series that will hopefully aid you in your NAS choice and ultimate purchase.
CPU Type
At the heart of any NAS device is the CPU or integrated controller. It is what drives the hardware and in the case of Synology, is the backend engine for their DSM 5.2 operating system and NAS interface product. Each of these controllers offers a unique capability and is used throughout the Synology product line. The following is a description of some of the controllers and the models they are installed in.
- Marvell Armada 370/375
 The Marvell suite of CPUs/Integrated Controller offer a SoC (System on Chip) design that makes it easy to build a low cost but powerful NAS device. Marvell is the industry leader in on-board controllers for several hard drive manufacturers and is a tried and true chip for even the most robust of scenarios. Synology uses the Marvell controller in their Home and Small Business series which include the DS214se, DS414slim, and DS115J devices which offer an 800 MHz to 1 GHz CPU solution. In addition the DS2155, and DS115 series of NAS devices offer an upgrade in memory addressing and are more suited for the small business user.
Corrupted Exchange database
The Exchange database can become corrupted in different ways, for example, if the Exchange server is shut down incorrectly or if the hard disk is defective. Because it may be difficult to correct a corrupted Exchange database, Microsoft recommends that you perform regular backups of the Exchange database. This article describes how to troubleshoot a corrupted Exchange database.
Trying to repair an Exchange database should be a last resort. Often these attempts can lead to irretrievable data loss. The most common causes of corruption occur in the information store. Typically this will involve any one of public or private EDB files. When an Exchange database is corrupted, you may not see any warning signs, or you may experience the following symptoms:
- You may not be able to access the Global Address List.
- The Microsoft Exchange Server Information Store does not start or you cannot stop it.
- Users cannot send or receive emails.
- Event 1018 is logged in the application event log and hardware failures logged in the system log.
- The client computer may appear to stop responding (hang) for a while.
- You may receive a "failure to connect to the Exchange server" message.
Backing up and restoring Virtual Server
To back up Virtual Server, you can:
- Back up by using software that supports the Volume Shadow Copy Service.
- Manually back up its various configuration files and resource files by using standard file backup software. To back up a virtual machine in this manner, the virtual machine must be turned off.
- Back up a running virtual machine by using live backup software on the guest operating system.
Restoring Virtual Server involves reinstalling Virtual Server and copying the backed up files into the appropriate locations in the file system.
Back up by using software the supports Volume Shadow Copy Service
When you use backup software that works with the new Volume Shadow Copy Service writer for Virtual Server to back up your host operating system, you can back up Virtual Server and its running virtual machines without needing to install backup agents inside the guest operating system of the virtual machines.
Restoring the entire virtual machine
Use the procedure described here to restore the entire virtual machine. During the restore process, you select a recovery point or backup and the Unitrends backup system uses the backed up data to create a new VM on the ESX host you select.
Note about VMs with hardware version 10: VMs with hardware version 10 can be restored only to ESX versions 5.5 and higher.
To perform a restore of a virtual machine
- Select the vCenter, stand-alone ESX server, resource pool, vApp, navigation group, or virtual machine in the left Navigation pane and click Restore.
The list of available backups that display in the next step is filtered by the selection you make here.
Note: If you do not see resource pools, vApps, virtual machines, or navigation groups in the Navigation pane, click the Gear icon at the bottom of the Navigation pane, check Show Virtual Machines in Navigation Tree, and click Confirm. - Select a recovery point by selecting the highlighted day in the calendar and then select the associated recovery point time. The recovery point time can be as associated with a full, differential, or incremental backup.
- Click Next (Select Options) at the bottom on the screen. A list of ESX servers displays. The selected virtual machine can be restored to the original ESX server or to any other ESX server that is registered or is part of a vCenter server that is registered. Note that the target ESX server must be the same version or newer than the original ESX server that hosted the virtual machine. It is highly recommended to perform recovery of the virtual machines to an ESX server version that matches the original ESX server.
- Optionally select a resource pool or vApp to restore to. If no resource pool or vApp is selected, the VM is restored to the root of the ESX host.
- Select the Datastore on the target ESX server.
- All disks’ metadata is restored by default, including metadata for excluded disks. Uncheck Restore Excluded Disks Meta Data? to prevent excluded disks’ metadata from being restored. If you choose to restore all metadata, it is important to note that the virtual machine and all the virtual hard drives will be recovered to the selected datastore. Ensure enough space is available on the datastore for all the virtual hard drives (including excluded drives) to be recovered.
- Enter a name for the restored VM in the Virtual Machine Name field or accept the default name. Every restore creates a new virtual machine. If the original VM still resides on the ESX host you select for the restore, it is not overwritten.
- Click Restore to initiate the restore. Every restore initiates two jobs: the first restores the configuration files or metadata for the virtual machine being restored, the second restores the data.
- To view the status of the restore jobs click on Settings > System Monitoring > Jobs.
Recovering a SQL Server Database from Suspect Mode
A couple of days back at I got a call from my support team informing me that one of our database located on the Production Server went into Suspect Mode. The version used was SQL Server 2005 Service Pack 3. Being a Production Database server, it was a Priority 1 incident and the expected time of resolution was 4 hours..
Solution:
The first step was to identify why this incident occured and after investigation it was found that it was due to the corruption of the transactional log file of the database.
I connected to SSMS using the sa login credentials and located the SUSPECT database:
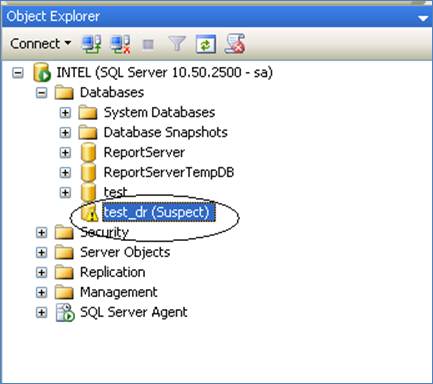
I then reset the status of the SUSPECT Database by executing the below T-SQL query against the master database.
EXEC sp_resetstatus 'test_dr';
Copyright © 2026 DataRecoup Recovery Services. All Rights Reserved. Designed by DataRecoup Lab.
