- Home
- About Us
- Recovery Services Individual RecoveryEnterprise RecoveryAdditional Recovery
- Software
- Testimonials
- Locations
Dynamic VHD Recovery
HyperV is Microsoft’s offering for handling the virtual disk environment. As with all new technologies there are times when even the best laid plans of mice and men go awry. This segment offers some answers into the recovery of the most difficult of scenarios, the Dynamic VHD deletion. The following are a few steps that hopefully will allow you to mount your deleted VHD and in doing so bring you and or your client back online.
Building an Image:
For a Fixed VHD this part is easy since for all practical purposes a Fixed VHD is a partition in file form. It has the same attributes and characteristics as a standard partition and maintains the same file system components. There is a bit of metadata and the front of the file but all in all a very basic partition. A dynamic partition however is only as large as the amount of data necessary to maintain the embedded VHD block handler and the actual file system data. In order to recover a dynamic partition I suggest trying to create a VHD file the same size as the maximum size of the VHD if it were full. This value is found in the ‘Size’ column of the VHD Finder under ‘Found VHDs’. Even if the amount of data is less than the total size of the partition the VHD handler will ignore the overall size and just address the actual data.
Mounting the image through software:
There are several good pieces of software that will read a dynamic VHD file and recover the data. There are even pieces of software that will expand the dynamic VHD and make it a Fixed VHD in order to recover the data. Acquire one of those tools and use it to recover the data from the partition.

Your Windows Server 2003 Migration Checklist
After a 12 year run, Microsoft is finally set to withdraw extended support for the Windows Server 2003 family of operating systems. After 14 July, Microsoft will not provide any patches, updates or support to businesses using Server 2003 unless they take out an extremely expensive custom support agreement.
In the event that your business does not have a spare $9 million (or access to public funds), the only cost effective option available is to take the leap and upgrade to one of the two more recent versions of Server – 2008 or 2012. But only a few days until the deadline, what do you need to do to be ready? This checklist will take you through the most important steps required to complete a successful migration.
1. Assess your upgrade options
Chances are that your direct upgrade options are severely limited if you are still using Windows Server 2003 because the hardware simply will not handle the demands of a later version. Even if you can coax an upgrade to Server 2008 you must decide whether the effort and relatively short remaining lifespan of the OS outweigh the benefits of buying an upgraded system capable of running Server 2012.
Use this handy guide to find out more about the different upgrade options you have available.
2. Assess your migration options
In all likelihood you will need to purchase a brand new server and migrate data and settings from the original machine. It is important to note that Microsoft does not provide an automated upgrade tool for moving from Server 2003 to Server 2012.
Instead you will need to perform a double upgrade (2003 to 2008, followed by 2008 to 2012) or more likely, a manual migration between the two versions. For the rest of this guide we will assume you are migrating software, services and files to a completely new system running Windows Server 2012 R2.
Planning to back up and restore data
Deploying your operating system inside a virtual machine does not eliminate the need to archive your server data for long-term storage and disaster recovery. The primary reasons to continue archiving your server data are to meet requirements to archive data (business, legal, or financial requirements), to recover from a hardware or software disaster, and to recover from a site disaster.
You should consider a number of backup strategies. You can back up the data directly from inside the virtual machine using existing technologies and in the same way you back up your servers currently. Additionally, with Virtual Server 2005 R2 Service Pack 1, you can use backup software that uses the Volume Shadow Copy Service (VSS) writer to back up each of your physical computers running Virtual Server as well as all attached virtual machines without needing to install backup agents inside the guest operating system.
Best practices for designing a backup and archive strategy include:
- Back up only what is necessary.
- Schedule backups carefully.
- Choose the appropriate tools for backing up and restoring data.
[Guide] Installing VMware Data Recovery 2.0 for Vmware vSphere 5.5 (ESXi 5.5)
Download VMware Data Recovery 2.0 from vmware.com .Locate the VMwareDataRecovery_OVF10.ovf file inside downloaded ISO file. It is located under “VMwareDataRecovery-2.0.0.1861-433157-x86_64.iso\VMwareDataRecovery-ovf-x86_64″ You can use pismo file mount to mountISO images. Pismo file mount is freewareutility. Download Pismo File Mount
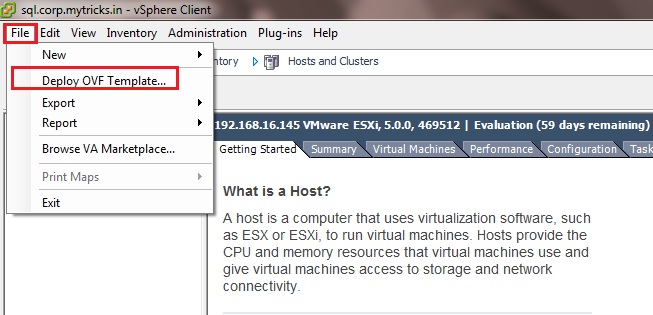
Login to the vCenter Server and select the host where you want to install the VMware Data recovery virtual machine. Click file -> Deploy OVF template as shown below,
Specify the path of your VMware data recovery OVF file i.e. “VMwareDataRecovery_OVF10.ovf”
New Virtual Machine Data Recovery Solution
Now that VMware vSphere 4 has been officially announced, it’s time to start talking about the new solutions that it will bring to the table. One solution that integrates with vSphere 4 is a handy little gem called VMware Data Recovery. The solution is designed for small to medium businesses, and can be used to backup virtual machines that are managed via ESX Servers or vCenter Servers. It’s compatible with vSphere 4 virtualization features like HA, DRS, VMotion, Storage VMotion, so regardless of where the virtual machines are migrated to, VMware Data Recovery will be able to locate them and back them up.
The Data Recovery solution comes in the form of a VMware Virtual Appliance (.OVF format). The appliance is securely managed with a vSphere Client plug-in that provides the interface to configure the backup and restore jobs. The solution allows for the creation of the following job properties:
- Virtual Machines to Backup
- Backup Destinations
- Backup Job Window
- Retention Policies
Copyright © 2024 DataRecoup Recovery Services. All Rights Reserved. Designed by DataRecoup Lab.
