- Home
- About Us
- Recovery Services Individual RecoveryEnterprise RecoveryAdditional Recovery
- Software
- Testimonials
- Locations
RAID 5 Failure and XOR Mathematics in NTFS 5 (Part 4)
We have had three installments on RAID 5 failure and how the XOR operation gives us insight into discovering the stripe size and drive order for an array. Understanding the next installment is critical to the entire method of reverse engineering a RAID 5 configuration.
We understand that when we use an XOR operation on the same bits we always return FALSE. So, XORing a TRUE and a TRUE give you a FALSE, and XORing a FALSE and a FALSE give you a FALSE. Understanding this, we can hopefully understand the following.
The Master File Table (MFT) Magic number is ‘FILE’. Four ASCII letters represented in HEX format as 46h, 49h, 4Ch, 45h. These HEX values correspond to the letters ‘F’, ‘I’, ‘L’, ‘E’ respectively. Now, when you XOR 46h with 46h you get 00h. This is illustrated in the following diagram.

Figure 1
RAID data saved after fire damage
We received a RAID-5 array which had failed following a fire. There were four hard drives in the array and two were showing signs of physical damage to the PCBs. Although administrators had remotely logged in and started to extrcat data from the RAID following evacuation, the server crashed shortly into the process.
The server had all the critical data relating to the business and more importantly - all their client files in PSD, PDF, AI, PNG and JPG formats. There was no reliable off site backup. Tape backups stored on site had also been damaged in the fire and it was decided it would be more economical and effective to recover data directly from the RAID.
Upon examination the PCBs on each hard drive in the RAID had literally melted and when the chassis were opened there was considerable smoke damage. Where the hard drive electronics were damaged, it is normally necessary to completely rebuild the circuitry. However the damage was so extensive that we had to find replacements and reprogram them. Each fire damaged drive was carefully cleaned to prevent contamination of the platters by soot and smoke particles. All the hard drives except one responded well to this process and we were able to gain sufficient 'images' of the raw data from the other three drives. Thankfully the redundancy in RAID5 meant we were still confident of a good data recovery

A guide to small business data backup
Everybody who’s ever used a computer for work should know that it’s vitally important to backup your data. Whether you’re looking at an unexpected drive failure or an accidental nudge of the delete key, having an up-to-date copy of your business data at hand could be enough to save your company from catastrophe.
Nonetheless, many of us are guilty of not backing up frequently enough, or even backing up at all. It’s seen as resource-intensive, complicated and a lot of work for an uncertain outcome.
In this guide, we’ll be dispelling some of those misconceptions as we explore how even a small business can regularly back up data in a secure, efficient and cost-effective way.
What is a backup, anyway?
To put it very simply, a backup is a complete copy of your data – whether that’s a single file or the contents of an entire drive – that resides on a different storage device to the original, and allows for it to be restored if data loss occurs.
Data loss can happen for all kinds of reasons, and it’s important to take all of them into account. It’s ok to keep a copy of your backups onsite in case a quick restore/recovery is needed, but ideally, you should keep one copy at a separate location. Unfortunately, there are disasters like a fire or flood which would damage all of the backups residing in that location.
How do I get started?
Before you boot up Windows Backup and start transferring files to your nearest USB stick, it’s important to think about the reasons you’re backing up and whether or not your chosen method fulfils those objectives.
In thinking about disaster recovery (DR), there are two very important metrics: recovery point objective (RPO) and recovery time objective (RTO). RPO refers to the maximum age data can reach before it becomes ineffective for backup purposes. RTO describes the length of time your business can survive without that data.
You don’t need a formal DR plan to back up your business data effectively, but auditing your drives and servers in terms of RPO and RTO is definitely a useful way to determine what form your backups should take, as well as where they should be stored.
After that, you can begin to think about making them a reality.
Easy Single File Restore from a Virtual Machine
Pssssst, do you want a know a secret ? It's a ridiculously simple way to do perform a single file restore from an active virtual machine. It uses no tapes, hardly any storage space and most importantly it will take literally all of 5 minutes ?? Interested ? Well read on....
Before I get to the 'secret sauce' I have to say 'I love snapshots'. They are a paradigm shift and game changer when it comes to backup and more importantly restore. They also form a cornerstone of this pretty cool technique (my opinion) that I will show you. Of course not all snapshots are born equally. Pretty much every array and many software platforms offer some form of snapshot implementation but how we vendors implement and to what effectiveness differs wildly. I'm not going to dive into the Nimble's snapshot implementation details in this blog, if you want to understand whats happening underneath the covers. Needless to say, Nimble snapshots are a great example of the most effective type of snapshots: Redirect-On-Write Snapshots and provide our customers with some compelling benefits:
- No performance degradation (whether you have 1 snapshot of a volume or 1,000 snapshots of that same volume).
- You can take them a frequently as you like (within reason); Why backup once a day when I can backup multiple times per hour ?
- They take up very little space (Compressed Incremental Block Changes is the only data that is stored).
- They are always online and full backups.
- They can readily cloned for a variety of purposes (Restores, QA, Development/Testing, Post-Mortem/Root cause analysis).
- Restores are simple and super fast - allowing for decreased recovery times and increased application availability.
- Thanks to CASL, they are stored inherently on the most cost-effective on-line medium (High capacity, Low RPM disk drives) and not associated to costly high performance storage.
The most important point of all the above is Restores; I used to work with a colleague who's mantra was 'Backup flatters, Restore matters'. As the Nimble removes the often found limitations of many snapshot implementations (namely, performance degradation, space utilisation, fragmented filesystem), it allows our customers to backup more frequently and therefore hold the point in time backups online for longer, allowing for much more effective restores. Compare the following application with a traditional backup architecture and effective snapshot and the restore options available at the point of time of a disaster:
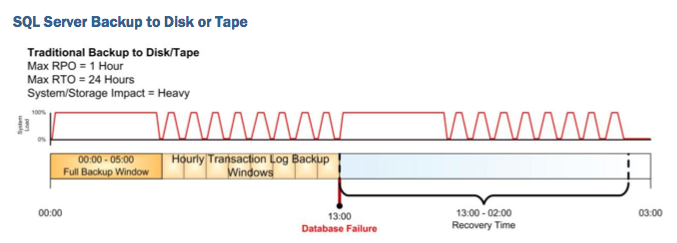
A database fails mid afternoon, I go back to my previous nights backup/dump, copy the data back and then replay forward to the point of corruption. A huge amount of effort and time to get application back in service. Alternatively if I am backing up using snapshots then I have a much closer restore to choose from:
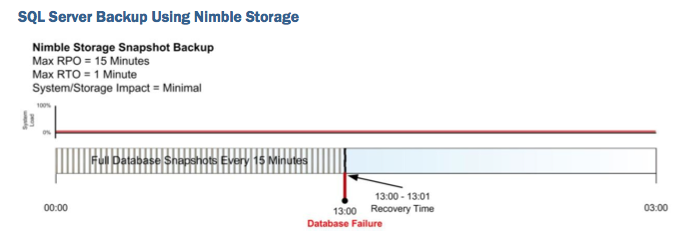
It takes no time to restore the data (as there is no data movement, just a manipulation of metadata) and I am much closer to point of disaster. It's a very different way to look at at conventional backup and restore.
Enough of this...Let's cut to chase...The Secret Sauce... the following is a demo I created that utilises snapshots to do a single file restore from a virtual machine. It has three integral components: Nimble Snapshots, Nimble Cloning and a piece of third party software called UFS Explorer. Both Snapshot and Cloning are features ship with every Nimble array so no license is required to use this functionality.
Fix Database Integrity Errors in Microsoft SQL Server
Sometimes you may encounter data integrity issues with one or more tables on a Microsoft SQL server. These errors may be found during a data integrity check using DBCC CHECKDB, or even via general use of the database. There are 3 options to correct the database integrity issues; safe repair, restore, and non safe repair (in that order).
Its always good practice to take an extra backup before any of these commands are run (specifically the non-safe repair option).
Safe repair using REPAIR_REBUILD:
Change the database to single user mode.
ALTER DATABASE <database_name> SET SINGLE_USER
Repair the database using a safe repair that will not cause data loss (if possible).
DBCC CHECKDB ('<database_name>', REPAIR_REBUILD)
Change the database to back to multi user mode.
Copyright © 2026 DataRecoup Recovery Services. All Rights Reserved. Designed by DataRecoup Lab.
