- Home
- About Us
- Recovery Services Individual RecoveryEnterprise RecoveryAdditional Recovery
- Software
- Testimonials
- Locations

Did you think solid state drives were infallible?
Well they're not. There are plenty of components that can degrade and data recovery tools are still in their infancy!
Performing data recovery on solid-state drives
There are fewer data recovery tools generally available for solid-state devices; however we have been working on our own proprietary tools to overcome vendor specific solid-state drive designs and built-in encryption technologies. We can now boast data extraction tools for almost every solid-state controller. As a result, this last month has seen a record for successful solid-state drive data recoveries!
When they were originally introduced, solid state drives SSD were noticable for both speed and reliability. It was generally thought that because an SSD has no mechanical parts failure rates were negligable. Mechanical components cannot wearing down over time - as there are none! Nevertheless, they still have to worry about electronic components degrading. Capacitors, power supplies and controller chips are all prone to failure.
How can the new RAID 10 technology help
After RAID 6 comes RAID 10 which combines mirroring and data striping in a nested array. This is also known as RAID 1 + 0 and is very fast and reliable, but does require at least four hard drives to work. Unlike RAID 5 whereby the user will experience data loss if two hard disks fail, RAID 10 can cope with multiple failures with only a minimal impact on performance. Whilst you may think the chances of two or more disks failing is remote, it is certainly not! RAID arrays use identical disks to maintain disk geometry. However this does mean that any manufacturing defects are likely to be evident across all disks in the array. If a hard drive fails, the strain on the others can often cause multiple failures.
The advantages of RAID 10 are clear. Higher performance combined with greater stability is one of the most important. Indeed, all disks in a single mirror have to fail for the system to collapse. Similarly, striping larger mirror sets also allows users to create larger virtual drives. Data can be read back from more than one disk simultaneously, meaning that read speeds are drastically improved.
In contrast, it should be remembered that mirroring means the data must be written twice. RAID 10 quite simply eats disk space, cutting what’s available in half! Also an additional disk drive is required for the mirror set which does effect the write speeds. Yet hard disks are cheap in comparison to data recovery services and this is often a sacrifice many users are willing to take to protect their data.
Setting up RAID 10 couldn’t be easier. We suggest two methods – software RAID and FakeRAID. Software RAID is driven by the operating system which handles all the logic. Fake RAID on the other hand is implemented at BIOS level and is often denoted by motherboard manufacturers. Always use hard drives of identical make, model, interface and capacity, ensuring they are flashed with the latest firmware. If you are using FakeRAID, make sure your motherboard has the ‘on board RAID’ feature. Unlike other RAID levels, Windows has no obvious options for creating RAID 10. So the user has to combine RAID 1 created in Storage Spaces and RAID 0 in the Disk Management utility. It may take a while to format the disks, but it is a straight forward process.
Facing Permanent Hard Drive Data Loss, See Why Data Recovery Services is So Useful
Being an avid desktop or laptop user, you may abruptly face weird hard drive related errors overtime. These errors are the consequences of improper uses of internal hard drive. Additionally, errors surfaced due to logical issues or physical corruption of the drive. These errors seems obvious in the beginning and supposed to be easily go away but eventually it becomes a serious concern and major cause behind dreaded data loss situation.
There are series of cases has been reported by majority of users that they have gone through data loss because of non-resolvable logical and mechanical failures of the drive. This could happen with the hard drive due to file system corruption, virus infection, incorrect operations with the disk, firmware corruption and other factors etc. Keep in mind that you cannot resolve or fix all of the hard drive errors and sometime, you just need to give up trying and ask for professional help to save important data just as data recovery experts. Experts at recovery lab can evaluate the problem drive and seek for possibility of recovering data out of the platters. They were pretty good at making damaged, corrupt or nonfunctioning hard drive usable again in order to retrieve files.
Backup of a VMware Virtual Machine (in Windows)
Contents
Backup of a VMware Virtual Machine (in Windows)
1 Backing Up a Virtual Machine with a SQL Server Database
1.1 Configuration Process
1.2 Configuring the HDP3500E
1.3 Configuring a Backup Host
1.4 Configuring a Virtual Machine
1.5 Adding a Backup Host
1.6 Adding an ESX Server (or a vCenter Server)
1.7 Creating a Backup Policy
1.8 Executing a Backup Task
2 Backing Up a Virtual Machine Without a SQL Server Database
2.1 Configuration Process
2.2 Configuring the HDP3500E
2.3 Configuring a Backup Host
2.4 Configuring a Virtual Machine
2.5 Adding a Backup Host
2.6 Adding an ESX Server (or a vCenter Server)
2.7 Creating a Backup Policy
2.8 Executing a Backup Task
Backup of a VMware Virtual Machine (in Windows)
When you back up a virtual machine without a SQL Server database, operations are similar in Linux and Windows operating systems.
When you back up a virtual machine with a SQL Server database, operations are different in Linux and Windows operating systems.
1 Backing Up a Virtual Machine with a SQL Server Database
For a virtual machine with a SQL Server database, install a NetBackup client and enable the SQL Server database recovery when creating a backup policy. Then you can recover a single file or the database.
2 Backing Up a Virtual Machine Without a SQL Server Database
When you back up a virtual machine without a SQL Server database, operations are similar in Linux and Windows operating systems. The operations of configuring an HDP3500E, backup host, and backup policy are the same; the operations of configuring a virtual machine are different.
1. Backing Up a Virtual Machine with a SQL Server Database
For a virtual machine with a SQL Server database, install a NetBackup client and enable the SQL Server database recovery when creating a backup policy. Then you can recover a single file or the database.
1.1 Configuration Process
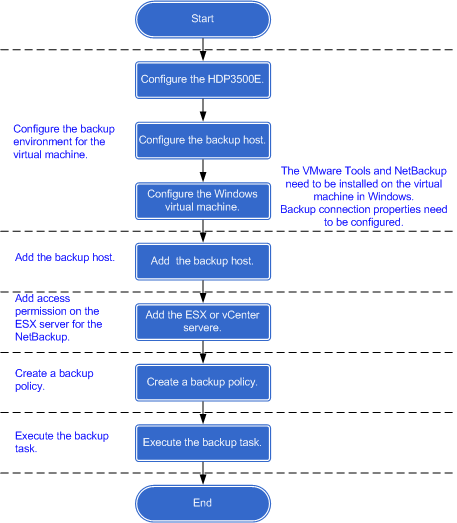
To back up a VMware virtual machine with a Windows SQL Server database, learn about the configuration process.
Before backing up a VMware virtual machine with a Windows SQL Server database, install a NetBackup client and configure backup properties to acquire permission on the database. Figure 3-1 shows the configuration process for a Windows VMware virtual machine.
The Easiest Way To Rebuild The master Database
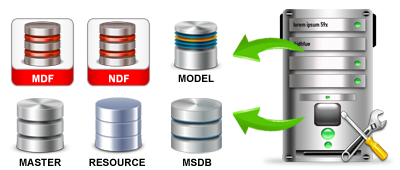
If your SQL Server master database becomes corrupt, such as from its disks losing power while SQL Server was running, the conventional advice is to rebuild the master database, start SQL Server, then restore the backup of the master database. That's because SQL Server won't start with a corrupt master database. But rebuilding the master database is usually quite time-consuming and frustrating, with a substantial amount of trial-and-error, especially if it's on a cluster. It can be so troublesome, a lot of people consider reinstalling SQL Server from scratch! If that's what you're facing, then this may be a big help...
The easiest way to rebuild the SQL Server master database is: Don't!
Instead, you can restore a backup of the master database on another instance of SQL Server as long as it's the same version of SQL Server, then use the restored files to replace the corrupt files on the broken system.
HOW-TO: Restore your master database backup to another instance of SQL Server and in the "To database:" section of the Restore Database dialog box, use an alternate database name such as "recover_master" to avoid conflict with the master database on this instance of SQL Server. This will cause the mdf/ldf to be named "recover_master.mdf" and "recover_master_1.ldf". Then detach the recover_master database, go into the file system, copy the recover_master.mdf and recover_master_1.ldf to the instance of SQL Server with the corrupt master database. Delete the corrupt master.mdf and mastlog.ldf files, rename recover_master.mdf to master.mdf, and rename recover_master_1.ldf to mastlog.ldf. Now you're ready to try starting the SQL Server service again!
Copyright © 2024 DataRecoup Recovery Services. All Rights Reserved. Designed by DataRecoup Lab.
