
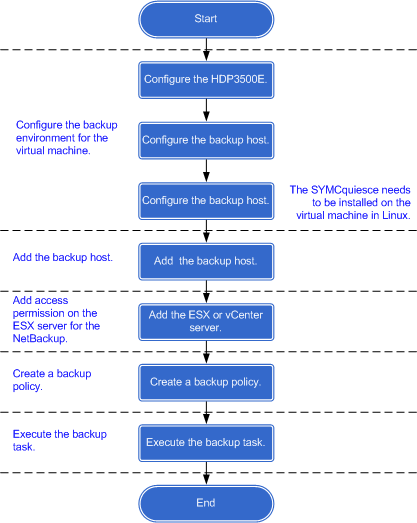
2 Configuring the HDP3500E
The NetBackup uses host names to communicate with other devices on the backup domain. Therefore, add mappings between host names and IP addresses of the ESX server (or the vCenter server), virtual machine, and backup hosts before backing up the VMware virtual machine.
Prerequisites
The HDP3500E has been initialized. For details, see Initializing Servers in the OceanStor HDP3500E G3 V100R003 Installation Guide.
Procedure
- Log in as user admin to the Integrated Storage Manager (ISM) of HDP3500E. The default password is Admin@storage
. For details, see Log In to the ISM in the OceanStor HDP3500E G3 V100R003 Installation Guide. - In the navigating tree, choose Backup Management > Backup Configuration, and click Name Management. The Name Management dialog box is displayed.
- Add mappings between names and IP addresses of the ESX server (or the vCenter server), virtual machine, and backup hosts.
- click Add.
The Add Network Host dialog box is displayed. - Enter the backup host name in Host name. Enter the IP address of the backup host in IP address.Click OK.
The Succeeded dialog box is displayed indicating that the mapping between the host name and IP address is added. - Click OK.
- Repeat 3.a to 3.c to add mappings between names and IP addresses of the ESX server (or the vCenter server) and virtual machine hosts.
Result
The added mappings are displayed in the Network Host Mappings list of the Name Management dialog box.
Configuring a Backup Host
A backup host performs backup tasks on behalf of VMware virtual machines. Install a NetBackup client and add mappings between host names and IP addresses of the HDP3500E and ESX server (or the vCenter server).
Context
A NetBackup client is installed on a Windows-based backup host. Prepare a host that runs Windows 2003 or 2008. Multiple backup hosts help improve the backup performance.
Procedure
- Log in as user Administratorto the backup host.
- Edit hosts file in C:\Windows\System32\drivers\etc to add mappings between host names and IP addresses of the HDP3500E and ESX server (or the vCenter server).
- Install the NetBackup client software.
For details on how to install the NetBackup client software, see Installing the NetBackup Client Software in Windows in the OceanStor HDP3500E G3 V100R003 Installation Guide.
Configuring a Virtual Machine
On a virtual machine in Linux, install a NetBackup client so that a single file can be recovered. Install the SYMCquiesce to guarantee a consistent file system.
Context
After a NetBackup client is installed, the SYMCquiesce installation file is stored in C:\Program Files\Veritas\NetBackup\bin\goodies\vmware-quiesce. You can copy the installation file to the virtual machine using an FTP tool.
You do not need to install the client for backing up the virtual machine unless you want to recover a single file. For quick file recovery, you are advised to install the NetBackup client software.
Procedure
- Download the SYMCquiesce.
- Log in to the backup host as user Administrator.
- Use an FTP tool to upload SYMCquiesce.1.0.0-001.iso from C:\Program Files\Veritas\NetBackup\bin\goodies\vmware-quiesce to the virtual machine.
- Install the SYMCquiesce.
- Log in to the virtual machine as user root
- In the installation file directory, runmount -oloopto mount SYMCquiesce.1.0.0-001.iso.
The following example explains how to mount SYMCquiesce.1.0.0-001.iso. from /home to /mnt.
linux:/home # mount -oloop SYMCquiesce.1.0.0-001.iso /mnt/ - In the /mnt directory, run rpm -ivh to install the SYMCquiesce.
- Install SYMCquiesce.1.0.0-001.i386.rpm in a 32-bit system.
- Install SYMCquiesce.1.0.0-001.x86_64.rpm in a 64-bit system.
- Install the NetBackup client software.
For details on how to install the NetBackup client software, see Installing the NetBackup Client Software in Linux in the OceanStor HDP3500E G3 V100R003 Installation Guide.
linux:/mnt # rpm -ivh SYMCquiesce.1.0.0-001.x86_64.rpm
 Preparing... ########################################## [100%]

1:SYMCquiesce ########################################## [100%] Adding a Backup Host
To back up a virtual machine using a backup host, add the backup host to NetBackup configuration.
Procedure
- Log in as userrootto the NetBackup Console of the HDP3500E master server, and the default password is Root@storage.
- In the navigating tree, choose NetBackup Management > Host Properties > Master Servers.In the Master Serverarea on the right, double-click the host name of master server.
The Master Server Properties dialog box is displayed. - On the navigation bar, click VMware Access Hosts.
- In the VMware Access Hostsarea, click Add.
The New Server dialog box is displayed. - Enter a backup host name in Enter Server name. Click Add.
You can also add more backup host names if multiple backup hosts reside on the same backup domain. - Click Close. The New Server dialog box is closed.
The added host is displayed in Add VMware access host. - Click OK. Adding the backup host is complete.
For details, see Logging In to the NetBackup Administration Consolein theOceanStor HDP3500E G3 V100R003 Installation Guide.
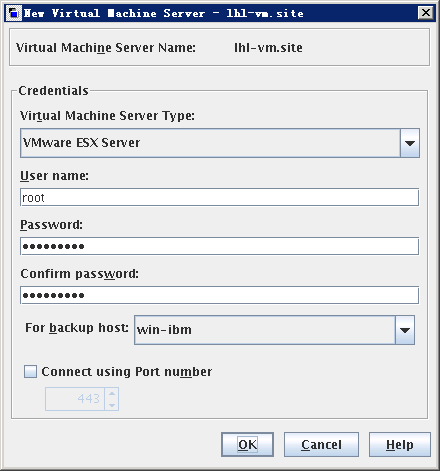
Adding an ESX Server (or a vCenter Server)
To back up or restore a virtual machine, the NetBackup server requires login credentials of an ESX server (or a vCenter Server) to verify permission.
Procedure
- In the HDP3500E Administration Console, choose Media and Device Management > Credentials > Virtual Machine Servers.
- Right-click the operation area and choose New Virtual Machine Server.
The Add Virtual Machine Server dialog box is displayed. - Enter the host name of the ESX server (or the vCenter Server) in Virtual Machine Server Name. ClickOK.
The New Virtual Machine Server dialog box is displayed. - Add the information about the ESX Server (or a vCenter Server).
- Set Virtual Machine Server Type to VMware ESX Server.If you are using a vCenter server, set it to VMware Virtual Center.
- Set User name to root if you are using the ESX server or the administrator name if you are using the vCenter server.
- Enter the password of user root of the ESX server or the administrator of the vCenter server in Password.
- Enter the password of user root or the administrator again in Confirm password.
- Set For backup host to the backup host configured in 3 Configuring a Backup Host.
- Confirm the previous information and click OK.
After verifying that the information is correct, the system displays the dialog box indicating that the operation succeeded. - Click OK.
The host name of the newly added ESX server is displayed in the list of virtual machine servers.
Creating a Backup Policy
A backup policy specifies backup information, including backup objects, execution time, execution frequency, storage location, and retention period.
Procedure
- Start the backup policy configuration wizard.
- In the HDP3500E Administration Console, choose NetBackup Management > Policies. On the All Policies page, right-click the page and choose New Policy.
The Add a New Policy dialog box is displayed. - In the Policy namedialog box, enter a policy name.
vmbck-linux s used as an example. - Select Use Backup Policy Configuration Wizard.
- Click OK and go to the backup policy configuration wizard.
- Select VMWare and Hyper-V.
- Click Next.
The Backup Policy Configuration Wizard: Select Client dialog box is displayed. - Select a backup host.
- In the Client to protect area, select VMware.
- Set VMWare backup host name to the backup host configured in 3 Configuring a Backup Host.
- Click Next.
The Backup Policy Configuration Wizard: Virtual Machine Optionsdialog box is displayed. - Set virtual machine options.
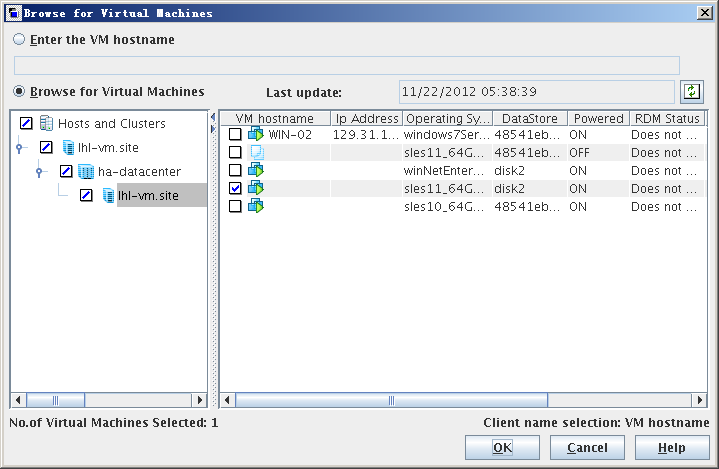
- Add the virtual machine that you want to back up.
- Set Virtual machines for backup to Manual. Click Add.
- Select Browse for Virtual Machines and unfold the ESX server node (or the vCenter server).
- Select a virtual machine that you want to back up. Click OK. The added virtual machine is displayed in the Backup Policy Configuration Wizard: Select Virtual Machines dialog box.
- Click Next. The Backup Policy Configuration Wizard: Backup Selections dialog box is displayed.
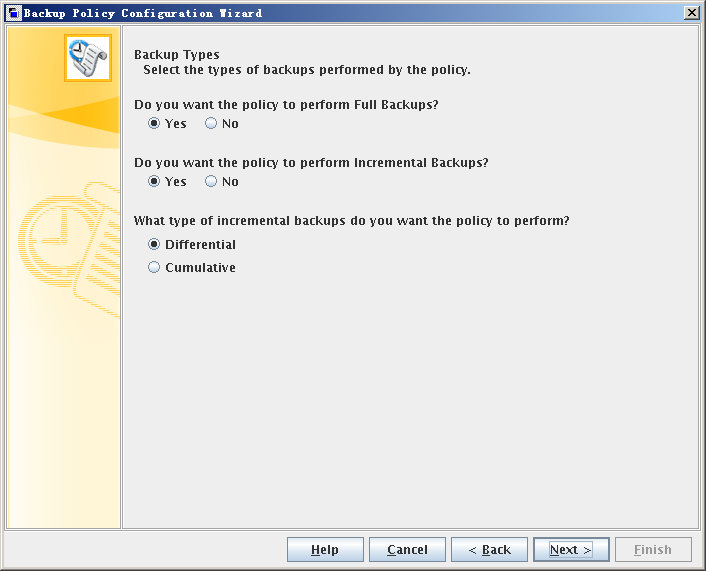
- Keep the default value and click Next. The Backup Policy Configuration Wizard: Backup Types dialog box is displayed.
- Set backup type.
- Set Backup Type based on requirements. Backup types include Full Backup, Cumulative-Inc Backup, and Differential-Inc Backup.
- Click Next. The Backup Policy Configuration Wizard: Rotation dialog box is displayed.
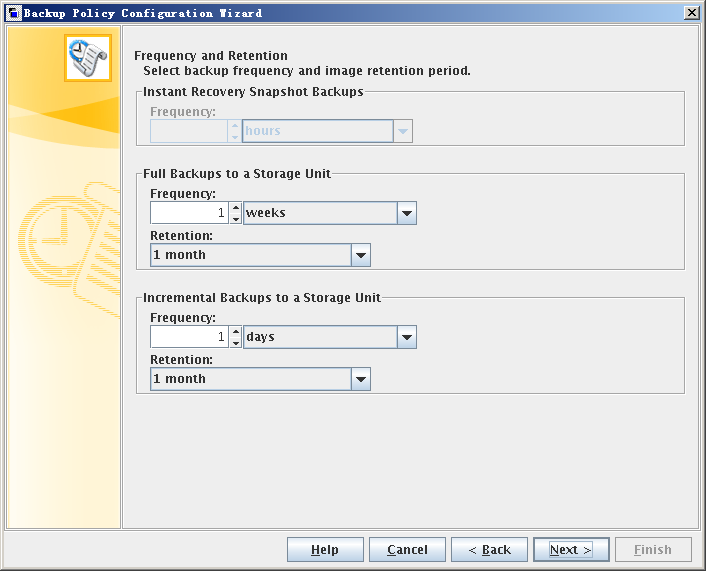
- Set the backup frequency and retention.
- Set the parameters as required. This section uses the following parameter values as an example.
- A full backup is performed once a week and the backup data is retained for one month.
- A differential incremental backup is performed once a day and the backup data is retained for one month.
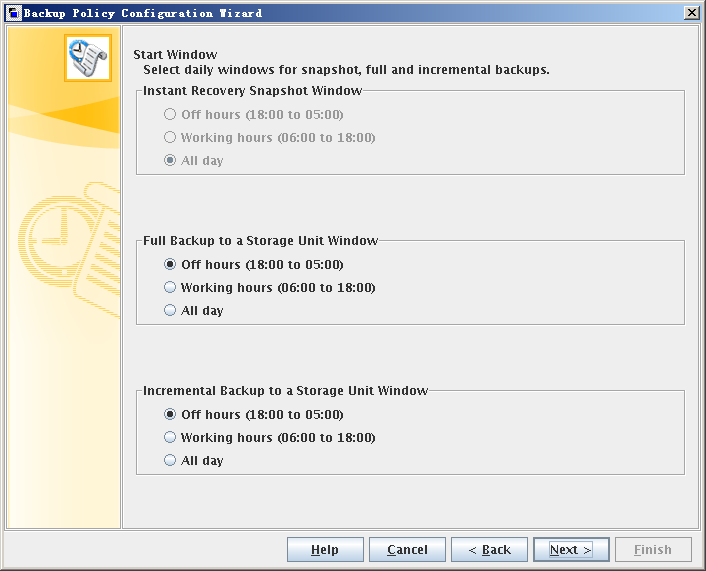
- Click Next. The Backup Policy Configuration Wizard: Start Window dialog box is displayed.
- Set backup period.
- Set Start Window based on requirements.
- Click Next. Summary information about the policy configuration is displayed in Backup Policy Configuration Wizard: Save Policy dialog box.
- Click Finish to complete the policy configuration.
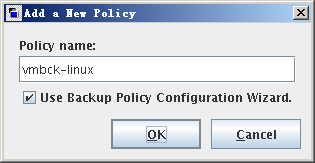
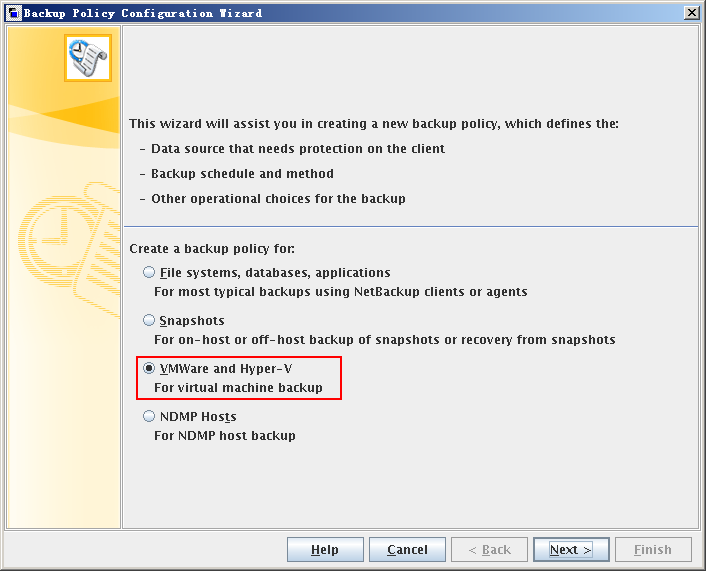
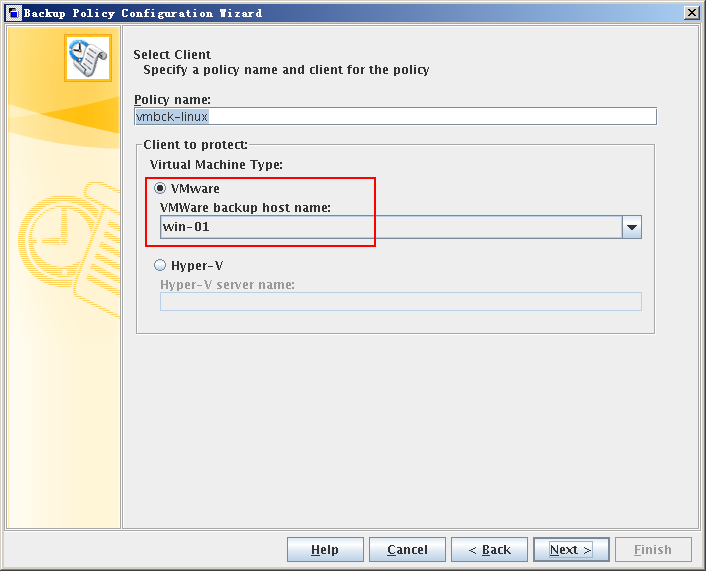
Table 1 describes the parameters and their reference values.
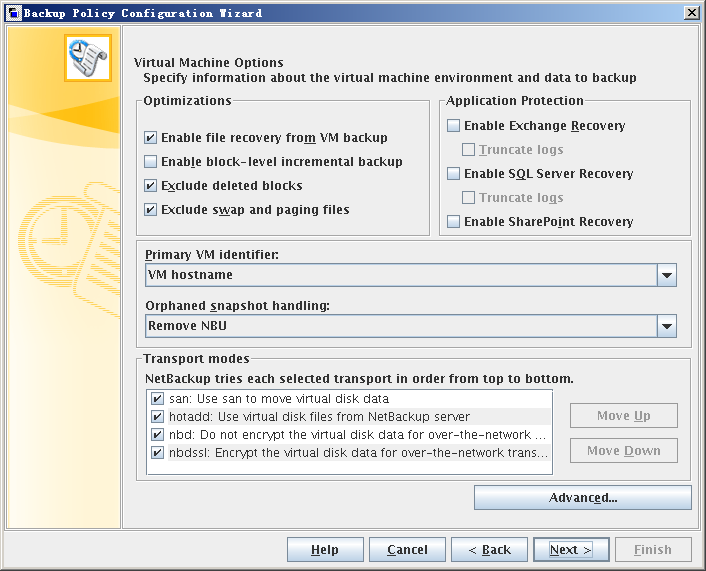
Table 2-1 Virtual machine options
Area | Available Value | Description | Reference Value |
|---|---|---|---|
| Optimizations | Enable file recovery from VM backup | This option allows recovery of individual files from the backup. With or without this option, you can restore the full virtual machine. You can also use this option for incremental backups: in the policy schedule, select differential incremental backup or cumulative incremental backup. To perform a VMware backup to a deduplication storage unit, select this option. This option provides the best deduplication rates. CAUTION: To back up a virtual machine that contains Veritas Storage Foundation Volume Manager volumes, disable this option. Also make sure that the Exclude deleted blocks option is disabled. | Selected |
Enable block-level incremental backup | For block-level backups of the virtual machine. This option reduces the size of the backup image. | Selected | |
Exclude deleted blocks | Reduces the size of the backup image by excluding any unused or deleted blocks within the file system on the virtual machine. This option supports the following file systems: Windows NTFS, and Linux ext2, ext3, and ext4. This option uses proprietary mapping technology to identify vacant sectors (allocated but empty) within the file system. CAUTION: To back up a virtual machine that contains Veritas Storage Foundation Volume Manager volumes, disable this option. Also make sure that the Enable file recovery from VM backup option is disabled. | Selected | |
Exclude swap and paging files | Reduces the size of the backup image by excluding the data in the guest operating system paging file (Windows) or the swap file (Linux). This option does not exclude the swapping and paging files from the backup. It only excludes the data in those files. If the files are recovered, they are recovered as empty files. | Selected | |
Application Protection | - | This option helps back up and recover a SQL Server database. You do not need to select this option for a Linux virtual machine. | - |
Primary VM identifier | VM hostname | The network host name for the virtual machine. NetBackup obtains the host name by means of a reverse lookup on the virtual machine's IP address. If no host name can be found, the IP address is used as the host name. CAUTION: NetBackup cannot select a VMware virtual machine for backup if it cannot obtain an IP address for the virtual machine. | VM display name |
VM display name | The name of the virtual machine as displayed in the VMware interface. A display name is assigned to the virtual machine when the virtual machine is created. When virtual machines are included in a NetBackup policy, restrictions apply to the characters that are allowed in the virtual machine display name. | ||
VM BIOS UUID | The ID assigned to the virtual machine when the virtual machine is created. This ID may or may not be unique, depending on whether the virtual machine has been duplicated. | ||
VM DNS Name | The VMware DNS Name of the virtual machine. In vSphere Client, this name appears on the virtual machine's Summary tab. This name may or may not be associated with the virtual machine's IP address. The VMware Tools obtain this name from the host name that is configured in a virtual machine. | ||
VM instance UUID | The globally unique ID assigned to the virtual machine when the virtual machine is created. Even if the virtual machine has been copied, only the original virtual machine retains this instance ID. The virtual machine duplicates are assigned different instance Universally Unique Identifiers (UUID). You are advised to select this option instead of VM BIOS UUID. CAUTION: VM instance UUIDs are not available for standalone ESX 3.5 or ESXi 3.5 servers. | ||
Orphaned snapshot handing | Ignore | The NetBackup ignores existing virtual machine snapshots (including snapshots previously created by the NetBackup) and proceeds with snapshot creation and the backup. | Remove NBU |
Abort | If any snapshot exists on the virtual machine, NetBackup aborts the job for that virtual machine only. | ||
Remove NBU | If a virtual machine snapshot exists that a NetBackup backup previously created: NetBackup removes the old snapshot, creates an updated snapshot, and proceeds with the virtual machine backup. | ||
Transport modes | san | For unencrypted transfer over Fibre Channel (SAN) or iSCSI. | nbd NOTE: If all transport modes are selected, the NetBackup sequentially tries them. You can click Move Up and Move Down to change the order. |
hodadd | Lets you run the VMware backup host in a virtual machine. This feature requires ESX 3.5 Update2 or later. | ||
nbd | For unencrypted transfer over a local network that uses the Network Block Device (NBD) driver protocol. This mode of transfer is slower than Fibre Channel. | ||
nbdssl | For encrypted transfer over a local network that uses the Network Block Device (NBD) driver protocol. This mode of transfer is slower than Fibre Channel. |
Set the previous parameters based on site requirements. Click Next.
The Backup Policy Configuration Wizard: Select Virtual Machines dialog box is displayed.
The Browse for Virtual Machines dialog box is displayed.
The list of existing virtual machines or the ESX servers managed by the vCenter server is displayed on the operation pane.
Full backup and differential incremental backup modes are used as examples.
This section uses Off hours (18:00 to 05:00) as an example.
Result
In the HDP3500E Administration Console, choose NetBackup Management > Policies. On the All Policies page, double-click the added policy to open it. Confirm the policy properties.
- On the Attributes tab page:
- The policy type is VMware.
- In Policy Storage,select a storage unit or storage unit group for the backup policy.
- Any_available
- stu-HDP3500E host name
- Storage unit configured on the tape library of the back-end storage device.
- Storage lifecycle policy.
- On the Schedules tab page, make sure that the backup frequency and retention of a schedule is correct.
- On the Clients tab page, make sure that you have selected the required virtual machine.
- On the VMWare tab page, make sure that the selected backup host and its parameters are correct.
 CAUTION:
Do not select stu-catalog as the storage unit for the backup policy. stu-catalogis used to store the backup image file of the HDP3500E's Catalog.
Based on the actual HDP3500E configuration, you can select one from the following storage units or storage unit groups:
If you select Any_available, the NetBackup will dynamically select an available storage unit after the policy is implemented.
HDP3500E host name can be the host name of the HDP3500E master server or media server.
Executing a Backup Task
Backups can be performed automatically based on a backup schedule or manually based on a backup policy. After a policy is created, you are advised to manually run the policy to check whether the policy functions properly.
Context
On a virtual machine in Linux without the SYMCquiesce, you are advised to power off the virtual machine before the backup to guarantee consistent data.
Procedure
- In the HDP3500E Administration Console, right-click the newly added policy and choose Manual Backup The Manual Backup dialog box is displayed.
- Select a backup schedule in Schedules and a backup host in Clients.Click OK to start backup task.
Follow-up Procedure
In the NetBackup Administration Console window, choose Activity Monitor. In the right pane, view the backup running status.
 NOTE:
NOTE:
Double-click a backup to view the backup information. If a backup fails, locate the fault according to the information.
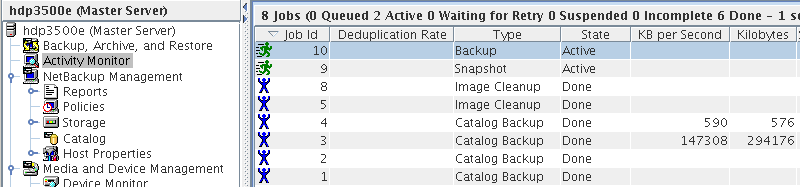
All backup states are illustrated as follows:
 Backups are in the queue.
- Backups are being performed.
- Backups are complete.
- Backups failed.
- Backups partially succeeded.
 Backups are in the queue.
 Backups are being performed.
 Backups are complete.
 Backups failed.
 Backups partially succeeded.
Reference: http://support.huawei.com/enterprise/docinforeader.action?contentId=DOC1000018623&partNo=10092

