- Home
- About Us
- Recovery Services Individual RecoveryEnterprise RecoveryAdditional Recovery
- Software
- Testimonials
- Locations
Virtual Servers (53)
Contents
Backup of a VMware Virtual Machine (in Windows)
1 Backing Up a Virtual Machine with a SQL Server Database
1.1 Configuration Process
1.2 Configuring the HDP3500E
1.3 Configuring a Backup Host
1.4 Configuring a Virtual Machine
1.5 Adding a Backup Host
1.6 Adding an ESX Server (or a vCenter Server)
1.7 Creating a Backup Policy
1.8 Executing a Backup Task
2 Backing Up a Virtual Machine Without a SQL Server Database
2.1 Configuration Process
2.2 Configuring the HDP3500E
2.3 Configuring a Backup Host
2.4 Configuring a Virtual Machine
2.5 Adding a Backup Host
2.6 Adding an ESX Server (or a vCenter Server)
2.7 Creating a Backup Policy
2.8 Executing a Backup Task
Backup of a VMware Virtual Machine (in Windows)
When you back up a virtual machine without a SQL Server database, operations are similar in Linux and Windows operating systems.
When you back up a virtual machine with a SQL Server database, operations are different in Linux and Windows operating systems.
1 Backing Up a Virtual Machine with a SQL Server Database
For a virtual machine with a SQL Server database, install a NetBackup client and enable the SQL Server database recovery when creating a backup policy. Then you can recover a single file or the database.
2 Backing Up a Virtual Machine Without a SQL Server Database
When you back up a virtual machine without a SQL Server database, operations are similar in Linux and Windows operating systems. The operations of configuring an HDP3500E, backup host, and backup policy are the same; the operations of configuring a virtual machine are different.
1. Backing Up a Virtual Machine with a SQL Server Database
For a virtual machine with a SQL Server database, install a NetBackup client and enable the SQL Server database recovery when creating a backup policy. Then you can recover a single file or the database.
1.1 Configuration Process
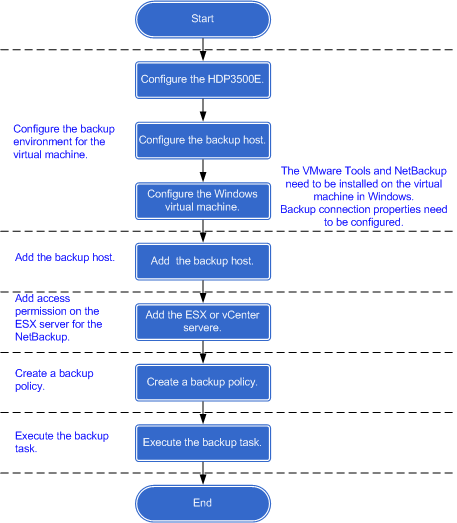
To back up a VMware virtual machine with a Windows SQL Server database, learn about the configuration process.
Before backing up a VMware virtual machine with a Windows SQL Server database, install a NetBackup client and configure backup properties to acquire permission on the database. Figure 3-1 shows the configuration process for a Windows VMware virtual machine.
When file loss or system damage occurs after a Linux-based VMware virtual machine is backed up, you can recover the file or full virtual machine using backup images.
1 Configuration Process
To back up a VMware virtual machine, learn about the configuration process in advance.
2 Configuring the HDP3500E
The NetBackup uses host names to communicate with other devices on the backup domain. Therefore, add mappings between host names and IP addresses of the ESX server (or the vCenter server), virtual machine, and backup hosts before backing up the VMware virtual machine.
3 Configuring a Backup Host
A backup host performs backup tasks on behalf of VMware virtual machines. Install a NetBackup client and add mappings between host names and IP addresses of the HDP3500E and ESX server (or the vCenter server).
4 Configuring a Virtual Machine
On a virtual machine in Linux, install a NetBackup client so that a single file can be recovered. Install the SYMCquiesce to guarantee a consistent file system.
5 Adding a Backup Host
To back up a virtual machine using a backup host, add the backup host to NetBackup configuration.
6 Adding an ESX Server (or a vCenter Server)
To back up or restore a virtual machine, the NetBackup server requires login credentials of an ESX server (or a vCenter Server) to verify permission.
7 Creating a Backup Policy
A backup policy specifies backup information, including backup objects, execution time, execution frequency, storage location, and retention period.
8 Executing a Backup Task
Backups can be performed automatically based on a backup schedule or manually based on a backup policy. After a policy is created, you are advised to manually run the policy to check whether the policy functions properly.
Configuration Process
To back up a VMware virtual machine, learn about the configuration process in advance.
Figure 1 shows the configuration process for a Linux-based VMware virtual machine.
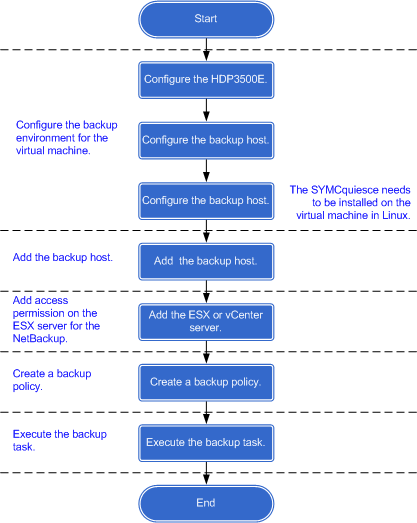
Image level backup of VMware based Virtual Machines (VMs)
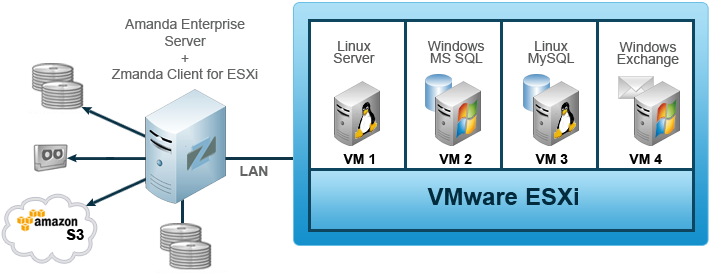
- Hot Backups of VMs: Your VMs are backed up using snapshots, without any downtime.
- Agentless Backup and Recovery: No software needs to be installed on ESXi or VMs. You can also install Zmanda agents within the VM, e.g. if you would like to backup and recover specific directories and applications.
- Complete image level backup: The whole VM is backed up to an image which is self-sufficient for restore. No need to re-install and re-configure the OS during recovery process.
- End-to-End restore: The VM can be fully recovered to the original ESXi server or to a different ESXi server - ready for immediate commissioning.
- Differential backups (block-level): Zmanda's VMware Client tracks the blocks that have changed since the last full backup. During a differential backup run, only changed blocks are backed up. This makes differential backups faster as well as reduces the amount of backup data transferred and stored. During recovery, a full backup image will automatically be combined with the relevant differential backup image. (Requires VMware 4 or higher)
- Efficient Backup Storage: Only those blocks that are being used by the VM are backed up. Zmanda VMware Client skips the unused raw space on the VMDKs. This considerably reduces the size of backup images as well as makes the backup process faster by reducing the amount of data being transferred. (Requires VMware 4 or higher)
- Selective restore of VM disks: Recover just the disks you need or recover just the VM configuration.
- Full Backup Management Features: Leverage all features of Amanda Enterprise with your VM backups: Compression, Encryption, Retention Policy Control, Monitoring and Reporting.
- Choice of Media: Backup your VM images to disk, tape or cloud.
- Consolidated Backups: Manage backup of your physical and virtual machine from a unified management console.
- No Proxy Servers Required: Your VMs will be backed up directly to the Amanda Backup Server, without needing another proxy server required in some solutions.
Pssssst, do you want a know a secret ? It's a ridiculously simple way to do perform a single file restore from an active virtual machine. It uses no tapes, hardly any storage space and most importantly it will take literally all of 5 minutes ?? Interested ? Well read on....
Before I get to the 'secret sauce' I have to say 'I love snapshots'. They are a paradigm shift and game changer when it comes to backup and more importantly restore. They also form a cornerstone of this pretty cool technique (my opinion) that I will show you. Of course not all snapshots are born equally. Pretty much every array and many software platforms offer some form of snapshot implementation but how we vendors implement and to what effectiveness differs wildly. I'm not going to dive into the Nimble's snapshot implementation details in this blog, if you want to understand whats happening underneath the covers. Needless to say, Nimble snapshots are a great example of the most effective type of snapshots: Redirect-On-Write Snapshots and provide our customers with some compelling benefits:
- No performance degradation (whether you have 1 snapshot of a volume or 1,000 snapshots of that same volume).
- You can take them a frequently as you like (within reason); Why backup once a day when I can backup multiple times per hour ?
- They take up very little space (Compressed Incremental Block Changes is the only data that is stored).
- They are always online and full backups.
- They can readily cloned for a variety of purposes (Restores, QA, Development/Testing, Post-Mortem/Root cause analysis).
- Restores are simple and super fast - allowing for decreased recovery times and increased application availability.
- Thanks to CASL, they are stored inherently on the most cost-effective on-line medium (High capacity, Low RPM disk drives) and not associated to costly high performance storage.
The most important point of all the above is Restores; I used to work with a colleague who's mantra was 'Backup flatters, Restore matters'. As the Nimble removes the often found limitations of many snapshot implementations (namely, performance degradation, space utilisation, fragmented filesystem), it allows our customers to backup more frequently and therefore hold the point in time backups online for longer, allowing for much more effective restores. Compare the following application with a traditional backup architecture and effective snapshot and the restore options available at the point of time of a disaster:
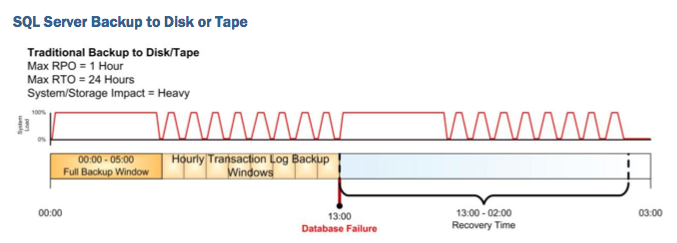
A database fails mid afternoon, I go back to my previous nights backup/dump, copy the data back and then replay forward to the point of corruption. A huge amount of effort and time to get application back in service. Alternatively if I am backing up using snapshots then I have a much closer restore to choose from:
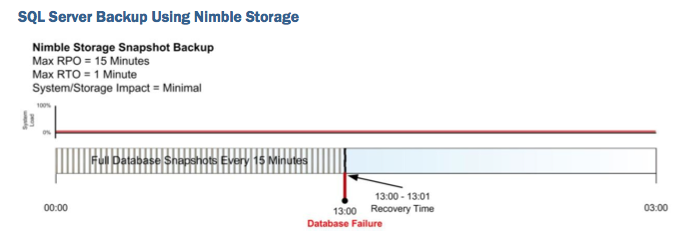
It takes no time to restore the data (as there is no data movement, just a manipulation of metadata) and I am much closer to point of disaster. It's a very different way to look at at conventional backup and restore.
Enough of this...Let's cut to chase...The Secret Sauce... the following is a demo I created that utilises snapshots to do a single file restore from a virtual machine. It has three integral components: Nimble Snapshots, Nimble Cloning and a piece of third party software called UFS Explorer. Both Snapshot and Cloning are features ship with every Nimble array so no license is required to use this functionality.
I just spent quite some time helping a friend to recover a corrupted virtual machine in VMware Fusion. It’s indeed a long and interesting (sometimes frustrating too) process that I learned quite some that I would never otherwise. I think you might find it useful as well. Hopefully, you don’t get a corrupted virtual machine, but in case you do, I am sure the post will help you.
The Problem
Let’s first look at what happened. Somehow the Windows 7 virtual machine could not boot itself with the following on the virtual machine console:
| Windows Boot Manager |
| Windows failed to restart. A recent hardware or software change might be the cause. To fix the problem: |
| 1. Insert your Windows installation disc and restart your computer. |
| 2. Choose your language settings, and then click “Next.” |
| 3. Click “Repair your computer.” |
| If you do not have this disc, contact your system administrator or computer manufacturer for assistance. |
| Status: 0xc0000225 |
| Info: The boot selection failed because a required device is inaccessible. |
How did the virtual machine get caught to this state? It’s not very clear, but probably caused by the upgrading of VMware Fusion from 6 to 7 while the Windows virtual machine was starting. Remember the little dialog reminding you that a new version of Fusion is now available and asking if you want to upgrade to it. It’s very easy to click the upgrade button, especially when multitasking on other things.
Anyway, once getting into this state, it’s no longer important on what exactly caused the problem, but how to fix the problem as a user. That’s where the long journey started.
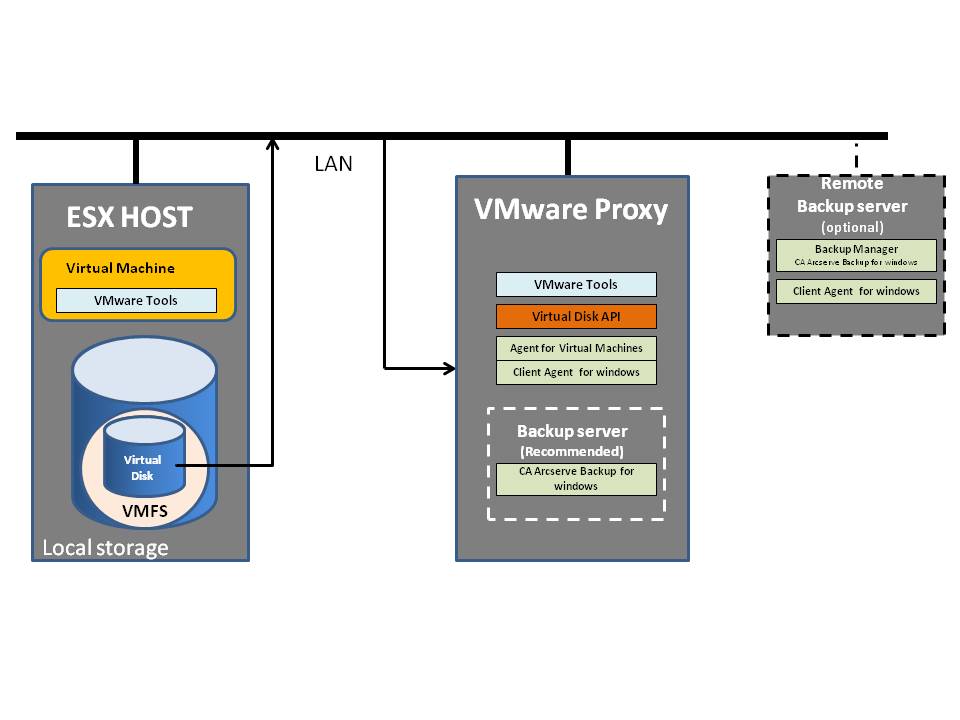
Virtual Disk Transport Methods
This document explains transport methods applicable for ARCserve version 15 and 16 using VDDK.
VMware supports file-based or image-level backups of virtual machines hosted on an ESX/ESXi host with SAN or iSCSI storage. Virtual machines can read data directly from shared VMFS LUNs, so backups are very efficient and do not put significant load on production ESX/ESXi hosts or the virtual network.
VDDK 5.0 release makes it possible to integrate storage-related applications, including backup, using an API rather than a command-line interface. VMware has developed back-ends that enable efficient access to data stored on ESX/ESXi clusters. Third party developers like CA can access these data paths (called advanced transports) through the virtual disk library. Advanced transports provide the most efficient transport method available, to help maximize application performance.
CA ARCserve supports transport methods discussed below: LAN (NBD/NBDSSL), SAN, and HotAdd.
LAN (NBD) Transport Mode
When no other transport mode is available, storage applications like Ca ARCserve backup can use LAN transport for data access, either NBD (network block device) or NBDSSL (encrypted). NBD is a Linux-style kernel module that treats storage on a remote host as a block device. NBDSSL uses SSL to encrypt all data passed over the TCP/IP connection. The NBD transport method is built into the virtual disk library, and is always available.
LAN (NBD) Transport Mode for Virtual Disk
VMware Data Recovery works with entire virtual machines, backing them up and restoring them in their entirety. These backup and restore operations are conducted using a backup appliance which stores the virtual machines to a location called the deduplication store. The virtual machines that are backed up are stored in a form that can be read by solutions such as Data Recovery, but the contents of these virtual machine backups are not otherwise easily readable. For example, the contents of the virtual machine backups in the deduplication store are not readable by users browsing through files using their operating system. There is no convenient mount point that can be used by operating systems like Windows to read the contents of these backups. Users may want to restore a previous version of a single file. Perhaps the file has been deleted or information from a previous version is required. In such a case, users can restore an entire previous version of the virtual machine that contained the file, but this may be cumbersome. Rolling back to previous versions may overwrite the existing virtual machine and even if the restored virtual machine is restored to an alternate location, the process may not be as fast as customers want. FLR addresses these issues by providing a way to access individual files within a restore point. With this access, you can choose to read copies of the files or restore them from within restore points to any other available location. For example, you could create two copies of the file in question to compare them, or you could overwrite an existing file with an older version contained within the restore point, thereby reverting to a previous version. Note that accessing these files only provides a way to read their contents. You cannot write to files that are made available in restore points through FLR.
 Thursday, 24 September 2015 00:00
 VMware quietly updates virtualization backup and restore solution
VMware takes a bigger step into the backup and restore market for virtual machines with the latest release of VMware Data Recovery 1.1 (VDR)
VMware administrators may be interested and happy to know that VMware is finally offering a product to help with the burden of virtual machine backup and restore. The product is called VMware Data Recovery (VDR), and while it isn't exactly brand-new, VMware did recently update it to version 1.1, though without much fanfare.
Much like physical machines, there is a tremendous need out there to back up virtual machines. If a mission-critical virtual machine has a problem, you need a quick way to get it back up and running. Remember, virtual doesn't mean "problem-free."
While many people believe that VMware had already introduced a backup application prior to VDR, that just isn't the case. VMware did introduce VMware Consolidated Backup (VCB), and despite its name, it doesn't actually back up and restore anything. Instead, what it does is provide others with a mechanism to access the VMFS file system in order to back up and restore virtual machines. With VCB, administrators were able to either create custom scripts to perform backups or leverage third-party backup software from VMware partners.
How to recover deleted vmdk vdi vhd files
If you deleted VMware (.vmdk), ORACLE (.vdi), and Microsoft (.vhd) virtual image files, you can use virtual machine data recovery freeware to undelete those vmware files. The virtual machine data recovery software can recover lost files from virtual machine.
- Recover all deleted Office Documents, Image and Multimedia Files, Database Files from virtual machines
- Restore all data from virtual machines lost due to formatting and file system corruption
- Supports easy recovery from FAT16, FAT32, NTFS, exFAT file, and NTFS file systems based virtual drives
To recover lost deleted formatted virtual machine files from Windows computer, you need to download a virtual machine data recovery freeware. You may download virtual machine data recovery software for free from: here
The Vmware data recovery software free can undelete files from virtual machine on Windows 8/7/XP/Vista 32/64 bit hard drive, include IDE and SATA hard disk, Hitachi, Western Digital WD, Seagate, Samsung hard drive. The Vmware data recovery software is also able to unformat HDD and restore lost photos jpg jpeg png gif tif tiff bmp and raw image data, videos (MP4, AVI, 3GP, AVCHD, H264, MPG, MPEG, MOV, WMV, ASF, VOB, M2TS, etc), and music (MP3, WMA, OGG, M4A) files. The Vmware file recovery software can retrieve back any lost files from Windows computer such as HP EliteBook, Lenovo ThinkPad, Asus Transformer Book T100, Acer, Samsung, Sony Vaio, Dell, Toshiba Kira Ultrabook and Qosimo, Fujisu, Panasonic, etc.
Steps to recover deleted files from virtual machine
Step 1. Install and run Vmware data recovery software asoftech data recovery and then in Asoftech Data Recovery, select drive where vmware files are deleted, then press "Next" to start scanning drive for lost files.
I was thinking about the first topic in the blog then thought about VDR since its very important to select a suitable back solution for your environment. I am not saying that VDR is the best :) but its one of the good solutions based on the scale of your environment.
VDR is composed of three components:
- Virtual Appliance (VA) which is managing the backup and restore process
- User interface plugin for vCenter to manage VDR
- Deduplication destination storage
Component of backup job:
- VMs to be backed up
- Schedule to run the backup
- Retention policy
How Backup Works ??
- Once a new job is created in vCenter using VDR plugin, the job will be submitted to VDR VA
- Up on schedule trigger, VA will create a snapshot for the current state of the target VM
- All new IOs for the target VM are submitted to delta.vmdk-. Also, the base vmdk- will be unlocked.
- VDR VA will mount the based vmdk and will start copying the contents to its local vmdk which is called the deduplication destination storage.
- The VA will apply deduplication technologies to the data stream before dumping it to deduplication storage.
- Once the backup is completed, VA will unmount the base vmdk and lock it back to the targeted VM
- VDR VA will consolidate the changes of delta.vmdk to the base vmdk and will delete the snapshot.
- On the next schedule of the job, VDR VA will follow the steps from the same steps expect for step 4. When VDR VA mount the base vmdk, it will use Changed Block Technology (CBT) to copy the changed blocks
ONLY in base vmdk to deduplication storage instead of full vmdk contents. - Those changed blocks will be combined with the latest backup in order to have a final full backup of the VM in VDR deduplication storage.
Copyright © 2024 DataRecoup Recovery Services. All Rights Reserved. Designed by DataRecoup Lab.
