Picture 1. Creating virtual machine. 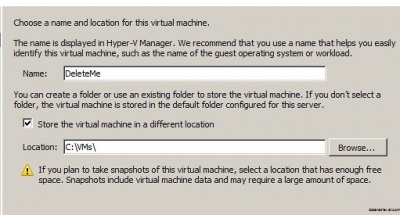
Then lets create several snapshots with Hyper-V Manager console. Take note of the file’s name for HDD on IDE Controller 0 and network settings.
Picture 2. Virtual machine settings. 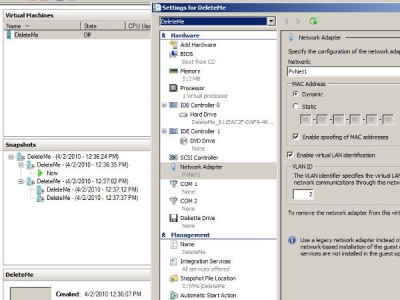
Let’s see what we’ve got in the c:\VMs folder after performing the abovementioned actions.
We can see that a new folder with the name of virtual machine has been created. This folder contains files of hard disks and snapshots and folders with configurations of VMs and Snapshots.
Picture 3. C:\VMs\DeleteMe folder. 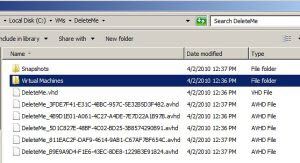
Picture 4. C:\VMs\DeleteMe\Snapshots folder.
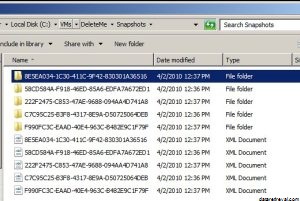
Picture 5. C:\VMs\DeleteMe\Virtual Machines folder.

So now we are done with entry-level configuration and its time to ‘lose’ a virtual machine.
To make the experiment simpler, let’s stop the Hyper-V management service via Hyper-V Manager console and copy the entire DeleteMe folder.
And additional assurance measure with Volume Shadow Copy. Using Volume Shadow Copy for disk containing virtual machine configurations file and on system partition is a fairly good option for recovering correct configuration or full virtual machine that was accidentally deleted. However, using Volume Shadow Copy for partition where disks and snapshots of virtual machines are stored, gives rise to some doubts. Copy on Write will induce additional overhead during write. Especially if a free space on the same partition is used for keeping Shadow Copy instead of a separate dedicated disk.
So, we laid the foundation, stopped the Hyper-V management service and now we can delete the virtual machine with Hyper-V Manager console.
Picture 6. Deleting DeleteMe VM. 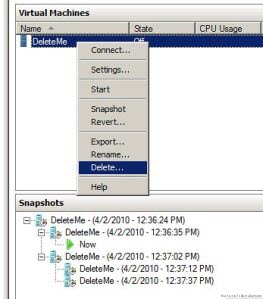
Having done that, lets compare contents of C:\VMs\DeleteMe folder before and after deletion.
The number of files reduced by half. It’s fantastic! Using Hyper-V Manager you can delete half of files in a compound folders structure with a single command!!!
Take note of the values in Location and Contains fields.
Picture 7. C:\VMs\DeleteMe folder before and after deleting VM. 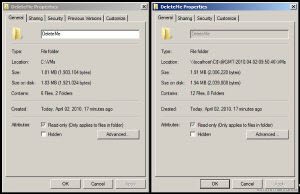
Why only half of files were deleted? Why there were 12 files? I can’t tell. I look forward to your comments and suggestions on this one:)
And it’s about time we start the recovery process.
Stop the Hyper-V management service. Copy DeleteMe folder contents back. Under these conditions this step corresponds to server recovery/reinstallation or connecting disks to another server.
And now the most interesting part begins… How do we explain to the Hyper-V service that it is required to read Vm’s configuration from some file in the file system? A hidden folder C:\ProgramData\Microsoft\Windows\Hyper-V is responsible for the internal operation of Hyper-V. This folder contains a role-based access control file to Hyper-V InitialStore.xml, as well as Virtual Machines and Snapshots folder. The trick here is that during the creation of virtual machine with Hyper-V Manager a NTFS hardlinks for configuration files are created in those folders. Therefore, the task comes to hard links creation.
So lets create a hard link by running mklink in administrative command line.
Picture 8. Creating hard link for VM’s configuration file. 
Then we launch the Hyper-V management service and see that nothing has showed up in the console…
All gone… We mined deep but there is no gold…
But an event log contains a letter from an upset Hyper-V:
Picture 9. Error loading VM configuration.
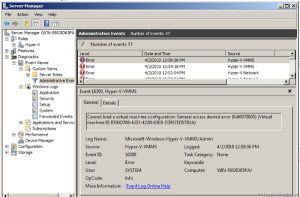
Check ACL of object hardlink for virtual machine, created with Hyper-V Manager. Our hardlink does not contain VM SID with Full Control permission.
For some strange reasons VM SID looks like GUID, from which consists the name of VM configuration file.
Stop the Hyper-V management service.
Modify ACL with cacls.
Picture 10. Modifying ACL for VM configuration file’s hardlink. 
Take note of the name Security Principal NT VIRTUAL MACHINE\<GUID>.
Launch Hyper-V management service.
Open Hyper-V Manager console. Oh miracle!!! Virtual machine is back.
Though without snapshots and with lost network. Note that the disk is connected to the correct avhd file. I.e. the virtual machine is in the last active condition but without a chance to delete or apply necessary snapshot.
Picture 11. VM configuration. 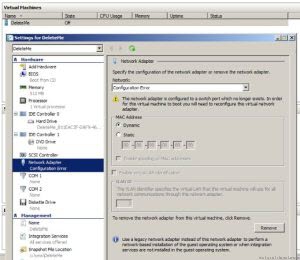
Let’s check the log again.
Picture 12. Error loading snapshots. 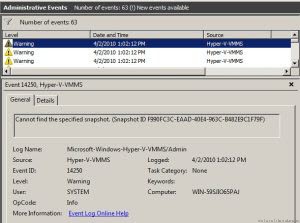
And again we have to stop the Hyper-V management service.
At this point we need to create a hardlink for every snapshot and add a Full Control permission for VM SID in every hard link.
Picture 13. Creating hardlink and modifying ACL for snapshot. 
Launch Hyper-V management service and another miracle…
Picture 14. Hyper-V Manager console. VM with snapshots connected. 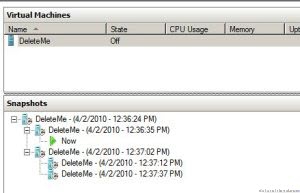
For it to be not only seen in the console but also use it, we need to give a Full Control access to VM SID to the folder containing VM’s configuration and disk files.
Picture 15. Modifying ACL of DeleteMe folder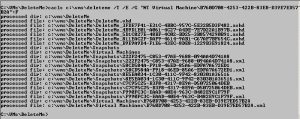
Voila! Now we can change VM configuration, replace the active snapshot and start looking for a solution for automatic selection of proper VM network interface…
P.S. Scrennshots and all tests made inside the VM.
P.P.S. Comments and feedback are welcome!


