
VMware took its first steps into data recovery and backup with VMware Data Recovery. VMware's only other tool in this field is VMware Consolidated Backup (VCB), which is gives other backup products easy access to VMware virtual machines (VMs). VMware Data Recovery is part of the vSphere Essentials Plus, Advanced and Enterprise (Plus) bundle and is not sold by itself. The version tested for this review is 1.0.1.362 (build 176771).
Installing VMware Data Recovery
As with PHD Technologies' esXpress, which is also reviewed in this series, VMware Data Recovery is packaged as a virtual appliance. After downloading the appliance, you import it as an Open Virtualization Format (OVF) file into vCenter, and the VM is automatically created. The appliance comes as a dual-vCPU VM with 2 GB RAM and 7 GB of disk space.
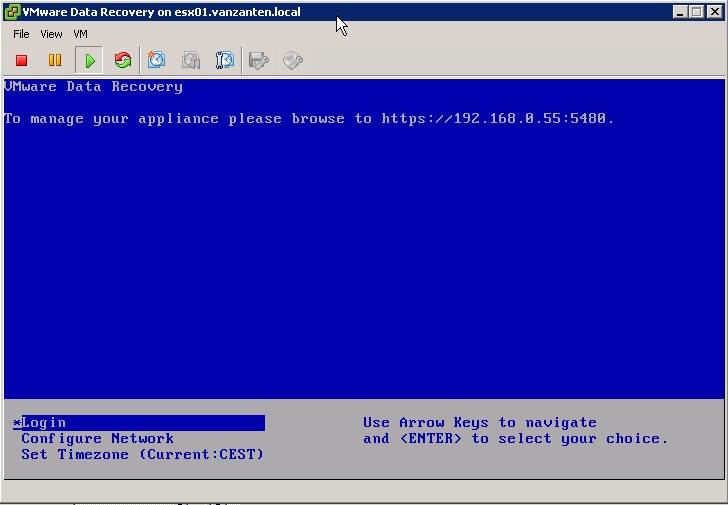
After importing the appliance, power it on and open the console. A screen appears in which you can configure the network settings and set the correct time zone.
Next install the VMware Data Recovery plug-in for vCenter. This is a Windows Installer (otherwise known as MSI) file that you install on each client computer that uses the vCenter client to manage VMware Data Recovery. After you have done so and the vCenter client restarts, start the Data Recovery plug-in. The first screen asks you which backup appliance to which it should connect. The Getting Started Wizard helps you enter the vCenter server name and credentials and configure one or more destinations.
VMware Data Recovery can back up to network shares or a disk attached to the backup appliance, and will protect 100 VMs per appliance. Should you need to protect additional VMs, a second appliance can be installed and configured. Keep in mind that these appliances act as single instances and don't talk to one another, which leads to double management.
The VMware Data Recovery interface
At first glance, the interface looks like the normal vCenter Hosts and Clusters view, but it has its differences. Each VM has a plus mark in front of its name so you can expand the view and see attached disks. When right-clicking a Data Center, Cluster, VM or resources pool, the options appear: back up or restore. Selecting an option starts the appropriate wizard. Every function you want to use is right where you would expect it to be.
Configuring VMware Data Recovery
VMware Data Recovery needs little configuration. The tab named Configuration offers the options to connect to a different backup appliance, set the destinations, check the backup appliance time (but not change it) and view data logs.
The destination is where backups will be saved. These destinations can be a Common Internet File System (CIFS), Samba network share, or they can be on local-attached storage. By "local," I mean that it is local to the backup appliance, as with normal VMs. Next, you connect a Virtual Machine Disk Format (VMDK) or Raw Device Mapping (RDM) to the backup appliance. Finally you mount it through the Configuration tab and format it before first use. Network destinations can be added through the Add Network Share feature.
Backing up VMs with VMware Data Recovery
VMware Data Recovery is built on the VMware vStorage application programming interface (API) for data protection. To create a backup, a quiesced snapshot is created of the virtual machine, and then the backup is written to a destination. Like most backup and data recovery vendors, VMware Data Recovery uses deduplication to preserve space per backup destination. Note that a maximum of eight virtual machines can be backed up concurrently, and no more than two separate destinations can be used during one backup.
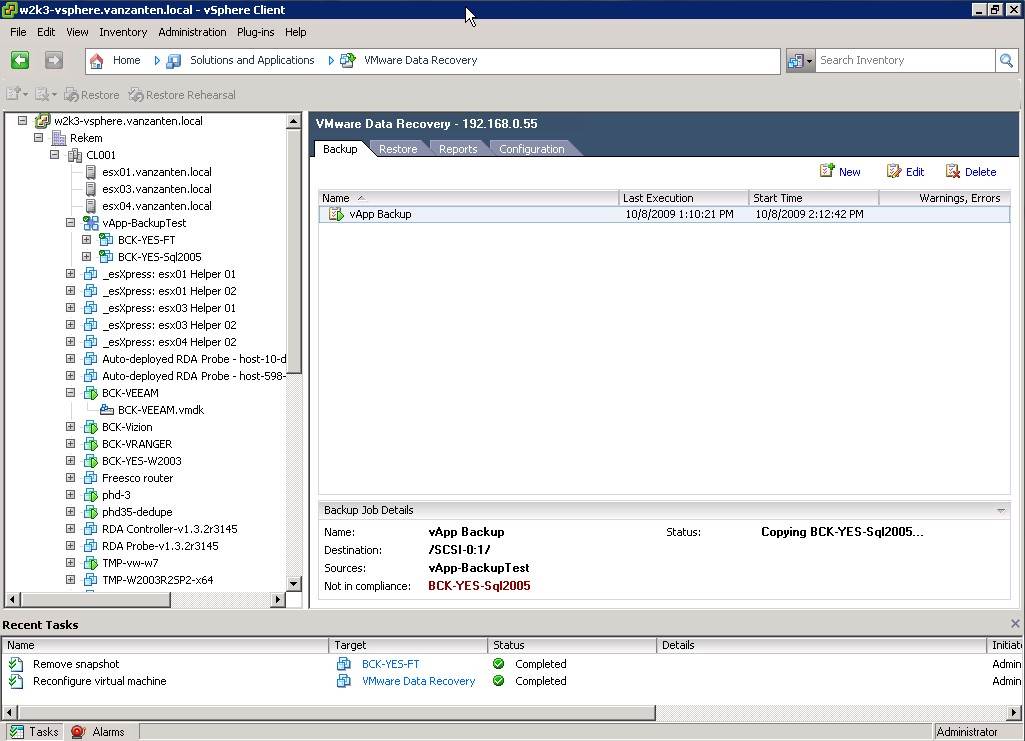
During a backup, all actions can be seen in vCenter tasks, which I like. When the backup begins, you can see the virtual machine snapshots. Then you can see the reconfiguration of the backup appliance, and when the backup has finished, you see the snapshot removal process.
I was surprised to see the reconfiguration of the backup appliance at first. After checking the settings, it showed that during a backup, the VMDK files that are backed up are attached to the backup appliance. This sheds light on the inner workings of VMware Data Recovery works -- essentially there is a disk-to-disk copy taking place. You can decide whether it is better to use network shares or to mount to a disk for your environment.
Scheduling and performing a quick backup
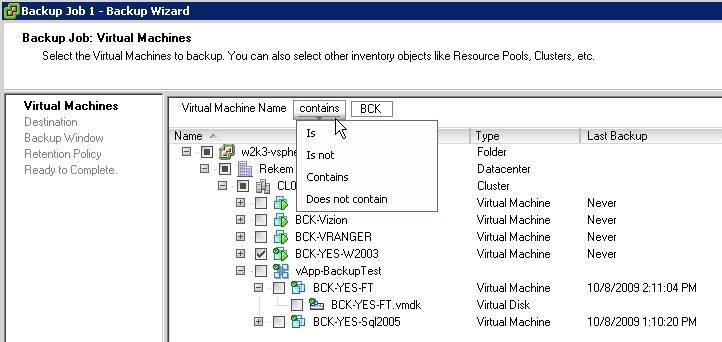
A simple right-click on a VM or a folder starts the backup wizard. By default, the wizard includes the right-clicked VM or folder in the selection, but you can extend your selection as you please. In the top of the selection window, a filter option makes selecting VMs simple. A backup of a resource pool checks which VMs are members of the pool before each backup. Removing or adding a VM to a resource pool also changes the backup selection.
After you select the VM, a list of possible destinations appears; it is also possible to add new destinations while in the wizard. Next, you'll see the backup window, where you can select when backups are and are not allowed to run. The last step is to define the retention policy.
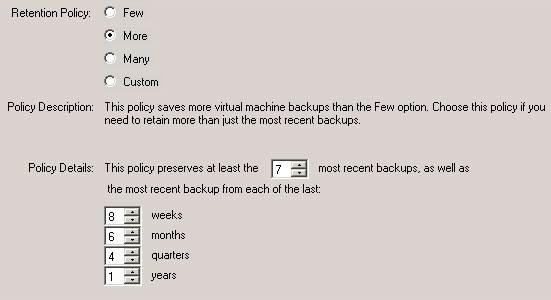
VMware Data Recovery is the only one of the four compared backup solutions that offers such a fine-grained retention policy. The policy details offer the option to set the number of yearly, quarterly, monthly and weekly backups that should be retained as well as the number of most recent backups. It is possible to choose one of the three defaults or define custom settings. In my opinion, every backup product should have this feature.
After this step, the backup job is ready. But here's where things get a bit clunky: You can't name the backup job. It will simply be called Backup Job X. You can rename it only once the wizard finishes.

Restoring data
You can practice a data restore with VMware Data Recovery to ensure that backups are created as expected. A practice run restores a VM with its VMDKs but does not overwrite the original virtual machine, and it disconnects the network adapters. Apart from that, the restored VM can be started just as you would a normal VM. When you do a restore rehearsal, double-check which folder you restore it to and which backup is linked to this folder; before you know it, a backup process will begin and make backup copies of the rehearsal VM.
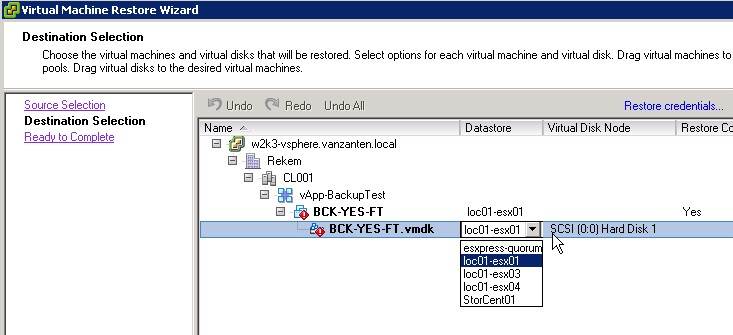
The restore rehearsal and the normal restore wizard are almost the same, and both feature a quirk. After you start the wizard, you immediately end up at the final step of the backup process. If you want to change where to restore to or what to restore, you have to go backward in the wizard to select a different destination and a different backup set. The default is to overwrite the current VM with the most recent backup.
When you start the restore, the original VM is hard-stopped, and the restored version overwrites it. After the restore has finished, it will automatically power on the restored VM. Once the restored VM runs, you can't tell the difference from the previous version. From all tested backup products, I found this restore procedure the smoothest
File-level restore
The file-level restore section on VMware Data Recovery is short; it doesn't have file-level restore. At least, that's VMware's official support statement. But when you look into the downloaded installation media, you will find an executable file called vdrFileRestore.exe. This is a low-level, basic tool to query the backup appliance for restore points linked to the VM you run vdrFileRestore in. In other words, to restore a few files from the BCK-YES-SQL2005 VM, you first connect to the running VM, and inside the VM you run the vdrFileRestore utility.
The most simple way to run vdrFileRestore is with the –a option, followed by the IP address (not the fully qualified domain name, or FQDN) of the backup appliance. Next you see a list of restore points that the backup appliance has in store for you. Here you can choose which restore point you want to use, and then the VMDKs from that restore point get mounted as extra disk. With simple drag-and-drop activity, you can copy files from the restore point to wherever you want. Keep in mind that NT File System (NTFS) permissions will get lost.
The vdrFileRestore utility works only on Windows XP, Windows Vista, Windows Server 2003 and Windows Server 2008, and it is not supported by VMware.
Reporting
When it comes to reporting, VMware Data Recovery has little to none. In the reports section, the backup products features an overview of events, running tasks, virtual machines, warnings and errors. The messages are brief, but you can get more detail by double-clicking these messages. I should add that the product doesn't email a report the next morning of all successful and failed backups; you are responsible for browsing through the scheduled backups and seeing whether they were successful.
Summary
While VMware Data Recovery has nice features for backup and data recovery, including a new of all actions during a backup as well as fine-grained options for the number of backups you decide to retain, it falls short in the areas of file-level restore and reporting.
Reference: http://searchvmware.techtarget.com/report/Test-driving-VMware-Data-Recovery
