
If possible, move the matrix to another drive or storage medium all files which are not components of the system or programs installed, such as music, movies, CDs, pictures, or other documents. This can significantly reduce the time required for images and output file size the image of our matrix!
Hard drive recovery service and raid data recovery by Data Retrieval in Memphis
The sequence of actions:
The first step is to prepare the boot-recognize the disc, floppy or flash drive in our case, on whose record your Ghost.exe a component of Symantec's Norton Ghost. With so prepared PenDrive (or CD or floppy disk), go to the motherboard BIOS, where he set the BOOT-ing the same to drive.
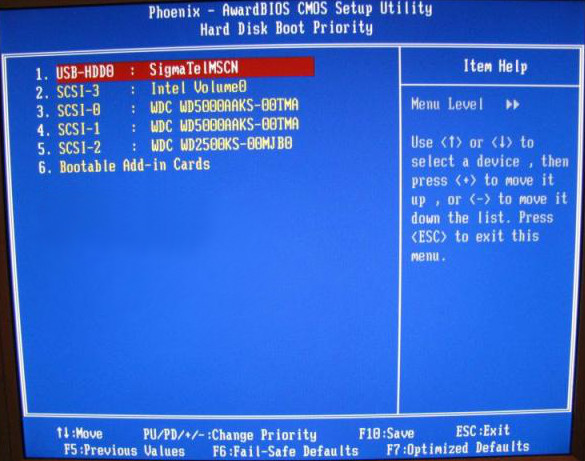
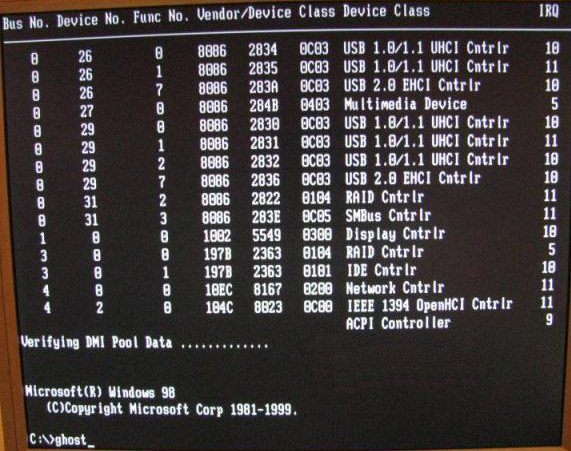
After making and accepting the changes, save the configuration of the BIOS and reboot your computer. After you restart and booted from the USB flash drive (or another drive mentioned above) shows us the command line, which we call the Ghost.
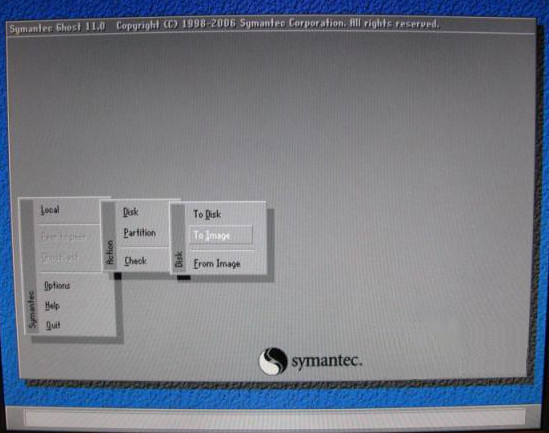
After a moment, turns on the main menu, Ghost, which in turn select "Local" from the menu that we might choose the option "Disk", and at the very end of the "The Image". When you select "Disk> To Image" in the Ghost will be drawn picture of our entire matrix, or all partitions, size, and all data contained therein and further information will be saved boot-sector, without which it would be possible to boot later.
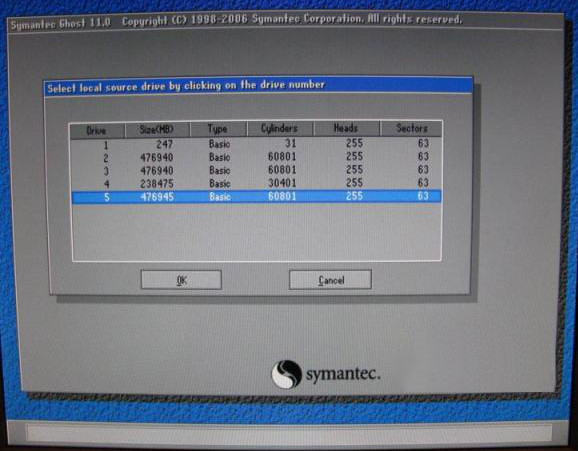
After confirming with ENTER option gives us a list of available drives in your computer, from which we choose our RAID.
The next step is to select the destination for the image of our matrix. It is imperative that the location was not related to the disk array. In the absence of the mouse when moving the menu cursor keys or the TAB key.
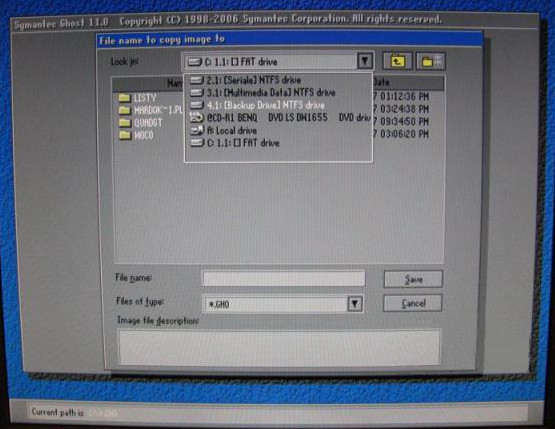
We have only left the name of the file and we can continue the process of creating an image by clicking the Save button.

In the next menu you can choose the degree of compression, but it must be remembered that the greater the compression the longer the time required to carry out the operation, but they get a smaller output file size. So when our matrix is not too great amount of data, you can select Fast or even at all click No to skip compression. Otherwise, consider choosing High. In addition, I note that there is a huge difference between options Fast and High in the size of the output file. However, in the time necessary to perform the operation is much longer noticeable.

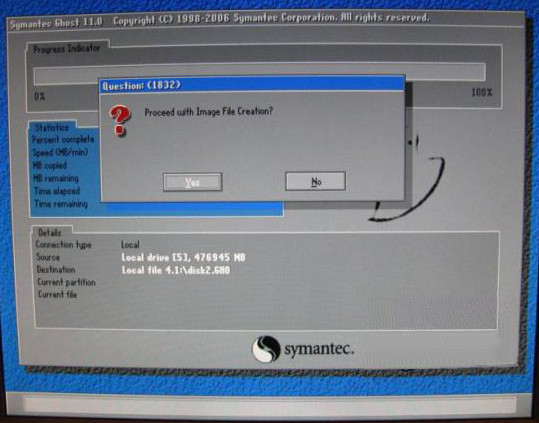
The last question that we must answer is "Proceed with Image File Creation?". After an affirmative answer will begin operation of creating an image.
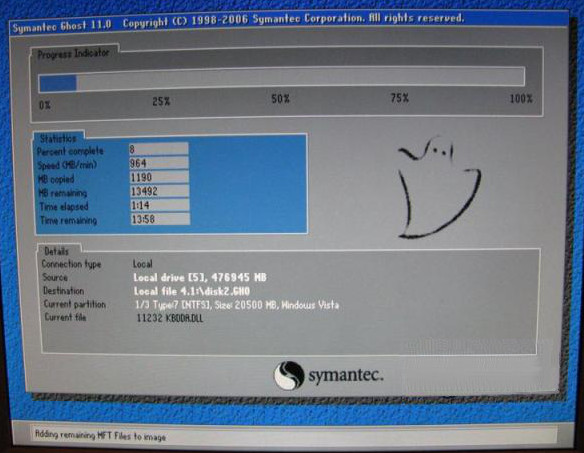
At this point you should be patient. Depending on the degree of compression, the amount of data on the array, or drive the same speed, this process can take from 15 minutes to several hours!
At the end of the backup we get that information. We can now turn off the Ghost program and restart the computer.

When I start the computer, go to the RAID configuration program.
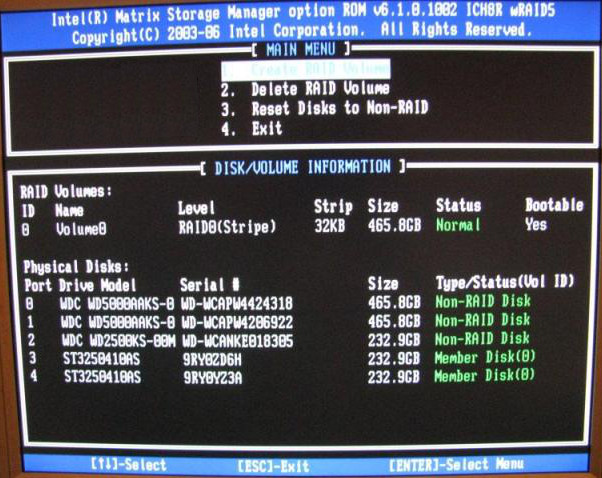
As previously produced a copy of your data by using Ghost, we can sleep without fear of our matrix by selecting the option "Delete RAID Volume" and then confirm our choice.
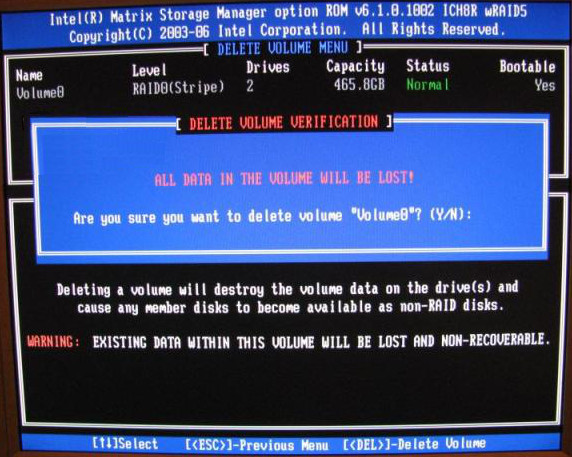
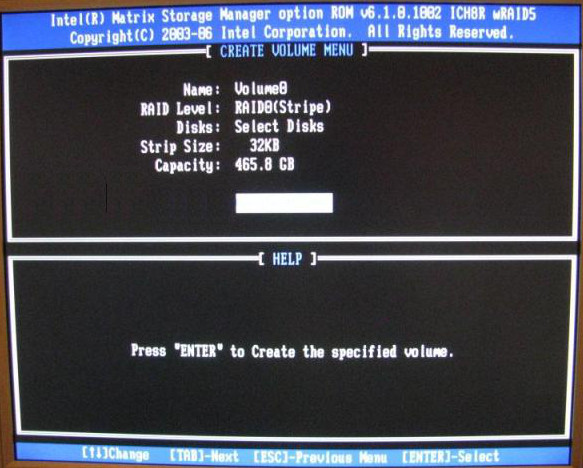
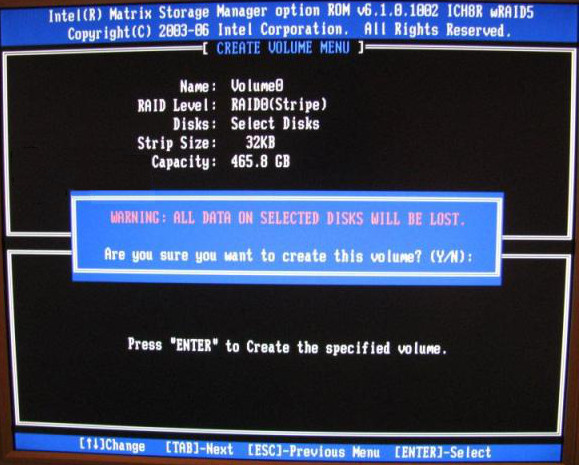
After removal matrix of our hard work gone in the mode of "Non-RAID Disk". Now click the option "Create RAID Volume" and create our matrix from scratch, this time selecting the Strip Size equal to 32KB.
After approval of the changes we have to leave the RAID configuration utility and go back to the Ghost to restore the data.
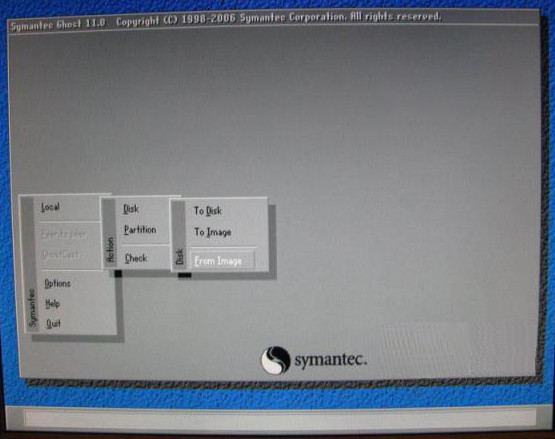
Running Ghost proceeds as before, but this time we choose, choose Local, then Disk, and finally From Image.
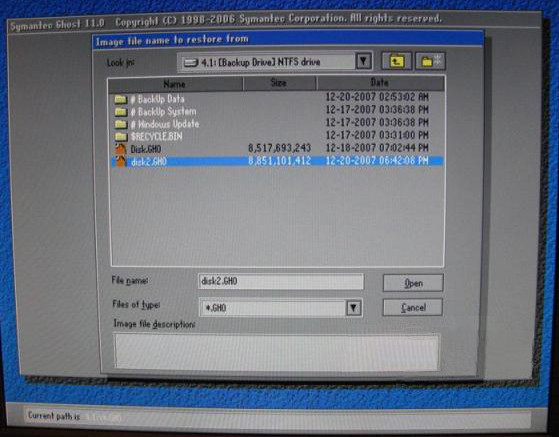
In the next menu, select the drive again, then the file in which you last saved the picture of our matrix.
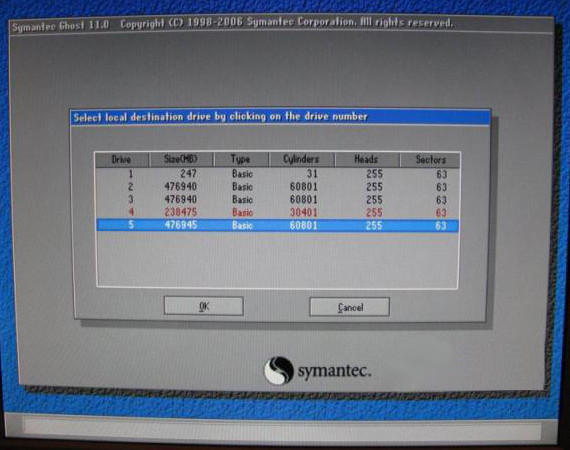
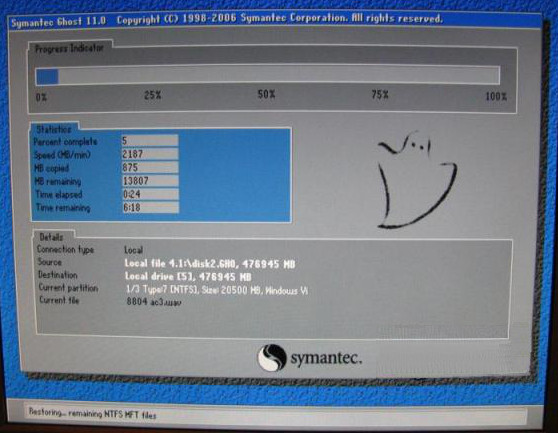
The next thing we ask our Ghost, is a destination to restore the image. From the list of available drives, select your newly configured matrix.
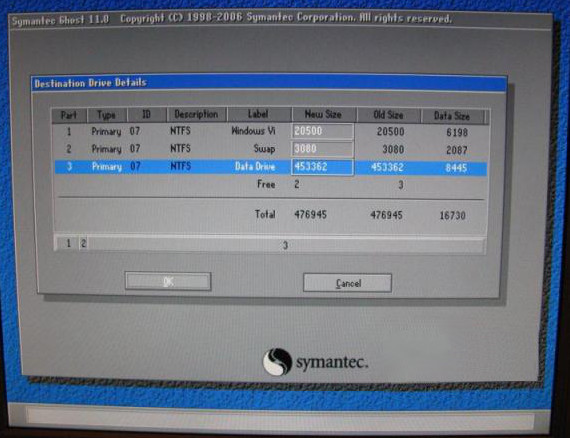
Now the program gives us the opportunity to modify the partition size of our matrix, where the earlier division of space did not meet our expectations, we can now correct, otherwise click OK. When you change the place allocated for each partition to keep in mind the amount of data that are already there!
We have yet to answer the last question put to us by the Ghost. It is "Proceed with disk restore?" - Answer in the affirmative.
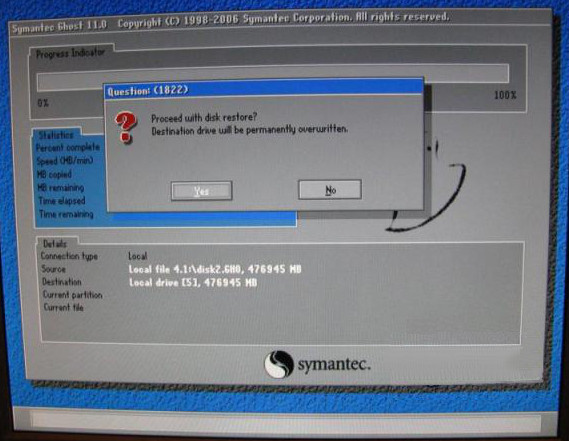
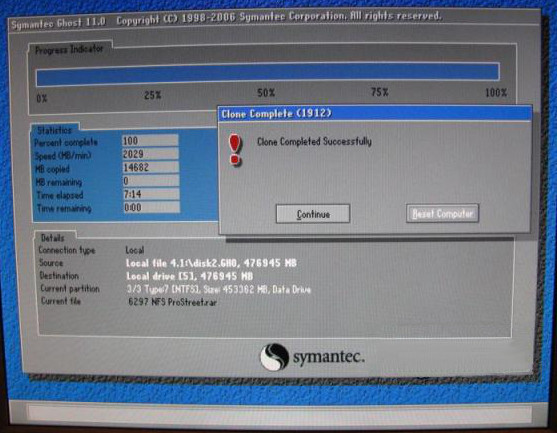
Again, equip yourself with patience, waiting for the restore process is complete. Comfort in the fact that the restore is much faster than creating an image, especially with a high degree of compression.
When finished, Ghost will tell you to restart your computer in order to confirm the changes. As shown in the message box choose "Reset Computer".
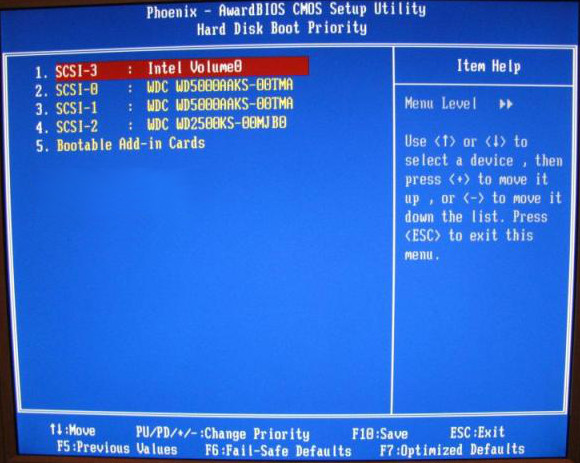
Re-return to the BIOS and set the BOOT from the matrix. Can we draw our CD / diskette drive or disconnect the USB flash drive.
And finally, we look forward to the newly configured matrix, with all data and our old system without having to set everything from scratch, or install all of our favorite applications.
Here you will find: raid information recovery.
This method tested on its matrix several times and always worked well with flying colors. Thanks to her I was able to among other things will change for the Strip Size in order to find the best one, and even add another disk to the array. Applications can be really a lot. The only drawback of this method is quite high requirements for space on an extra disk and, for large amounts of data, quite a lot of free time that is required to draw up, and then restore the image matrix. For the purposes of this article, I used the Ghost, which does not mean that you can not do the same with others like free counterparts. But then you must make sure that they offer the possibility of full copies of the hard drive with a partitioned and the ability to record information from the boot-sector.

