


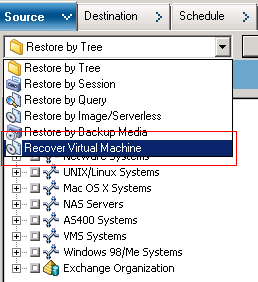
To recover VMware virtual machines
- Open the Restore Manager, click the Source tab, and select Recover Virtual Machine from the drop-down list as illustrated by the following screen:

The Recover Virtual Machine window opens. - To search for a VMware VM, perform one of the following actions and then go to the next step.
- To search for a specific VM, specify the name of the VM in the Virtual Machine Name field, and click Query.
The Virtual Machine Name specified displays in the VM list. - To search for all VMs, select ≪ ANY ≫ in the Virtual Machine Name field and click Query.
All the VMs in your environment display in the VM list. - To search using a partial Virtual Machine Name, replace the unknown characters with an asterisk, and click Query.
The Virtual Machines equaling the search criteria display in the VM list.
Example: Using 100-* returns the names of all VMs that start with 100-, such as 100-1, 100-01, and 100-001. - In the Search for virtual machine box, click VMware.
All the VMware VMs in your environment display in the VM list.
- To search for a specific VM, specify the name of the VM in the Virtual Machine Name field, and click Query.
- Complete the following fields in the VM list.
- VM Name (DNS Name) — Check the check box next to VM Name to specify the VMs that you want to recover.
Note: CA ARCserve Backup processes the restore operations sequentially when you specify more than one VM. - Backup Versions — Lets you specify a Backup Version.
You can accept the Backup Version displayed or click in the Backup Versions field and then click the ellipsis to search for multiple versions of the backup data. - Proxy Machine — Lets you specify the backup proxy system and the security information required to recover the VM image.
You can accept the Proxy Machine displayed or click in the Proxy Machine field and then click the ellipsis to search for and specify a different backup proxy system. - Path — Lets you specify the path to mount the VM image.
You can accept the Path displayed or click in the Path field to specify an alternate path for the temporary VM mount directory. - VMware ESX Host Name — Lets you specify the ESX Server and the security information required to recover the VM image.
You can accept the VMware ESX Host Name displayed or click in the VMware ESX Host Name field and then click the ellipsis to search for and specify a different VMware ESX Host system. - Data Store — Lets you specify the Data Store associated with the VMware ESX Host system.
You can accept the Data Store name displayed associated with the VMware ESX Host system or click in the Data Store field to specify the Data Store of the target VMware ESX Host system.
Note: Data Store is a case-sensitive value.
- VM Name (DNS Name) — Check the check box next to VM Name to specify the VMs that you want to recover.
- Click Options on the toolbar.
The Global Options dialog opens. - Click the Operation tab and specify the options that follow:
Note: The options that follow do not appear on the Operation tab unless the Recover Virtual Machine method is specified.Power on VMware or Hyper-V VM after restore — Lets you power on the VM after the recovery is complete.
Default value: Enabled.
Example: Specify this option when you must use the VM immediately after the recovery is complete.- Overwrite VMware VM, if it exists — Lets you overwrite the VM, if the VM exists.
Default value: Enabled.
When you restore a VMware VM, CA ARCserve Backup detects the VMs that reside in the host system. If the VM exists in the host system, this option lets you overwrite the VM using the existing VM UUID and host name.
Note:For troubleshooting information, see The Agent Does Not Delete Existing VMs after a Recover VM Job Completes.
- Click OK.
The options are applied. - Click Submit to submit the restore job.
The Submit Job dialog opens. - On the Submit Job dialog, select Run Now to run the job immediately, or select Run On and select a future date and time when you want the job to run.
Enter a description for your job and click OK.
The job is submitted.
Note: For more information about submitting jobs, see the Administration Guide.
Reference: Click here

