Tuesday, 22 September 2015 00:00

VMware Data Recovery 2.0 – the upgrade process from earlier version

Rate this item
(0 votes)

How to upgrade from VDR 1.2? The new VMware Data Recovery 2.0 (VDR) has been released together with the release of vSphere 5 – VMware vSphere 5 available for download – and since there is quite a few upgrades planned ahead, it might be handy to have it written/bookmarked on my website as well. The upgrade process is simple since all the configuration data (jobs, schedule, retention policy etc…..) is stored at the destination.There is several scenarios possible since you might use as a destination different options:

  • NFS
  • VMDK stored on Datastore
  • CIFS

How to proceed with the upgrade of VDR to the latest release?

01. Remove your backup destination disks from your VDR VM – So the first thing to do if you use VMDK as a destination on a datastore, is to “unlink” this virtual disk from your existing VDR 1.2 appliance. So first look at the configuration of your existing VDR and see where is the destination. If it’s a VMDK on a datastore, then you can simply remove the disk from the VM but leave the other radio button alone !!

The upgrade process should be straightforward since I’ll keep my deduplication stores and also my jobs. Those elements will get imported into the new VDR 2.0 after the deployment of the OVF file into vCenter.

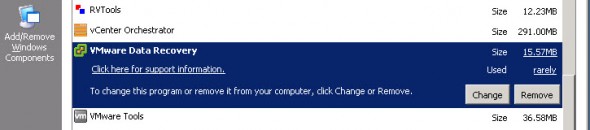
02. Remove the old vSphere Plugin – Go to add/remove programs and remove the old plugin from there.

After the old plugin uninstalled you can install the new VDR plugin. You should see the icon in vSphere Client once you connect back again with your vSphere client to your vCenter. If not, just go to the Menu Plugins > Manage Plugins. You can activate the plugin there.

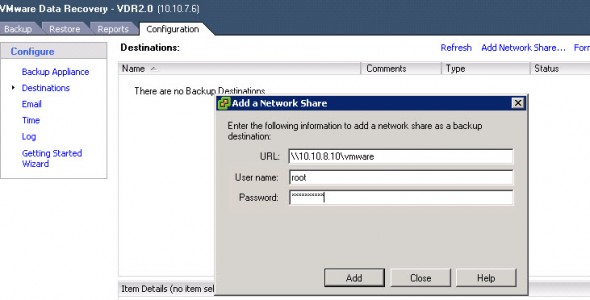
03. Specify the backup Destination – In my case I’m not using virtual disks attached to the appliance bu a simple network share. But even the network share retain the informations about the backup jobs, scheduling, retention policies etc….

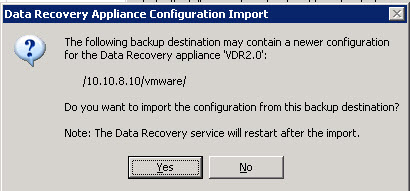
04 – Import the configuration and backups from your previous location – And when I reconnect my destination to the new VDR 2.0 appliance you’ll see that the message asking to import the configuration will appear. You can see the message which shows you the possibility to import your backups and settings from your previous location. Click yes to validate and import the backups and backup jobs.

So If I recapitulate on what was done:

  • Deploy the OVF file through vCenter and configure the VDR 2.0 (name, IP address, timezone…..)
  • Uninstall the old plugin and Install the latest VDR plugin for vCenter
  • Attach the VMDK’s or point to the old backup location through network, like I did.
  • Import the jobs from the de-duplication stores, to the VDR 2.0
  • Do an Integrity check.

Reference: http://www.vladan.fr/vmware-data-recovery-2-0-the-upgrade-process

Last modified on Tuesday, 22 September 2015 18:41
Data Recovery Expert

Viktor S., Ph.D. (Electrical/Computer Engineering), was hired by DataRecoup, the international data recovery corporation, in 2012. Promoted to Engineering Senior Manager in 2010 and then to his current position, as C.I.O. of DataRecoup, in 2014. Responsible for the management of critical, high-priority RAID data recovery cases and the application of his expert, comprehensive knowledge in database data retrieval. He is also responsible for planning and implementing SEO/SEM and other internet-based marketing strategies. Currently, Viktor S., Ph.D., is focusing on the further development and expansion of DataRecoup’s major internet marketing campaign for their already successful proprietary software application “Data Recovery for Windows” (an application which he developed).

Leave a comment

Make sure you enter the (*) required information where indicated. HTML code is not allowed.

Get Help Now

Thank you for contacting us.
Your Private Investigator will call you shortly.